WeVideo Tutorial: How To Use WeVideo for Video Editing
The first time I met someone who created a video and made words pop up on the screen while they were talking, I was convinced they were a sorcerer. It seemed like the most amazing thing I had ever seen.
Yes, if you are editing videos for the first time, it will take you a little while to learn. But, I am going to give you everything I wish I had known to save you tons of time and to help you create videos faster.
Also, be sure to check out my The Ultimate Guide to Creating a Successful Video Marketing Campaign: 20 Steps To Create Awesome Video too.
Choosing your video editing platform and trimming your footage
I recommend beginners start out with WeVideo. I have tried a bunch of different editing software and found it to be the easiest to learn for most people's business needs.
I love WeVideo because:
It's designed with beginners in mind. In fact, many kids use it in their school programs.
Everything is stored in the cloud. This means that you can edit from any computer anywhere which is super nice, and you can edit while other content is exporting or uploading.
It has tons of stock b-roll, transitions, and lower-third graphics (words that you can make appear on the screen).
You can export videos in high quality, up to 4k.
Let me walk you through the basics of the platform so that you can start editing right away.

If you shot your video on a fancy camera then just plug your SD card into your computer.
Then Click “media”

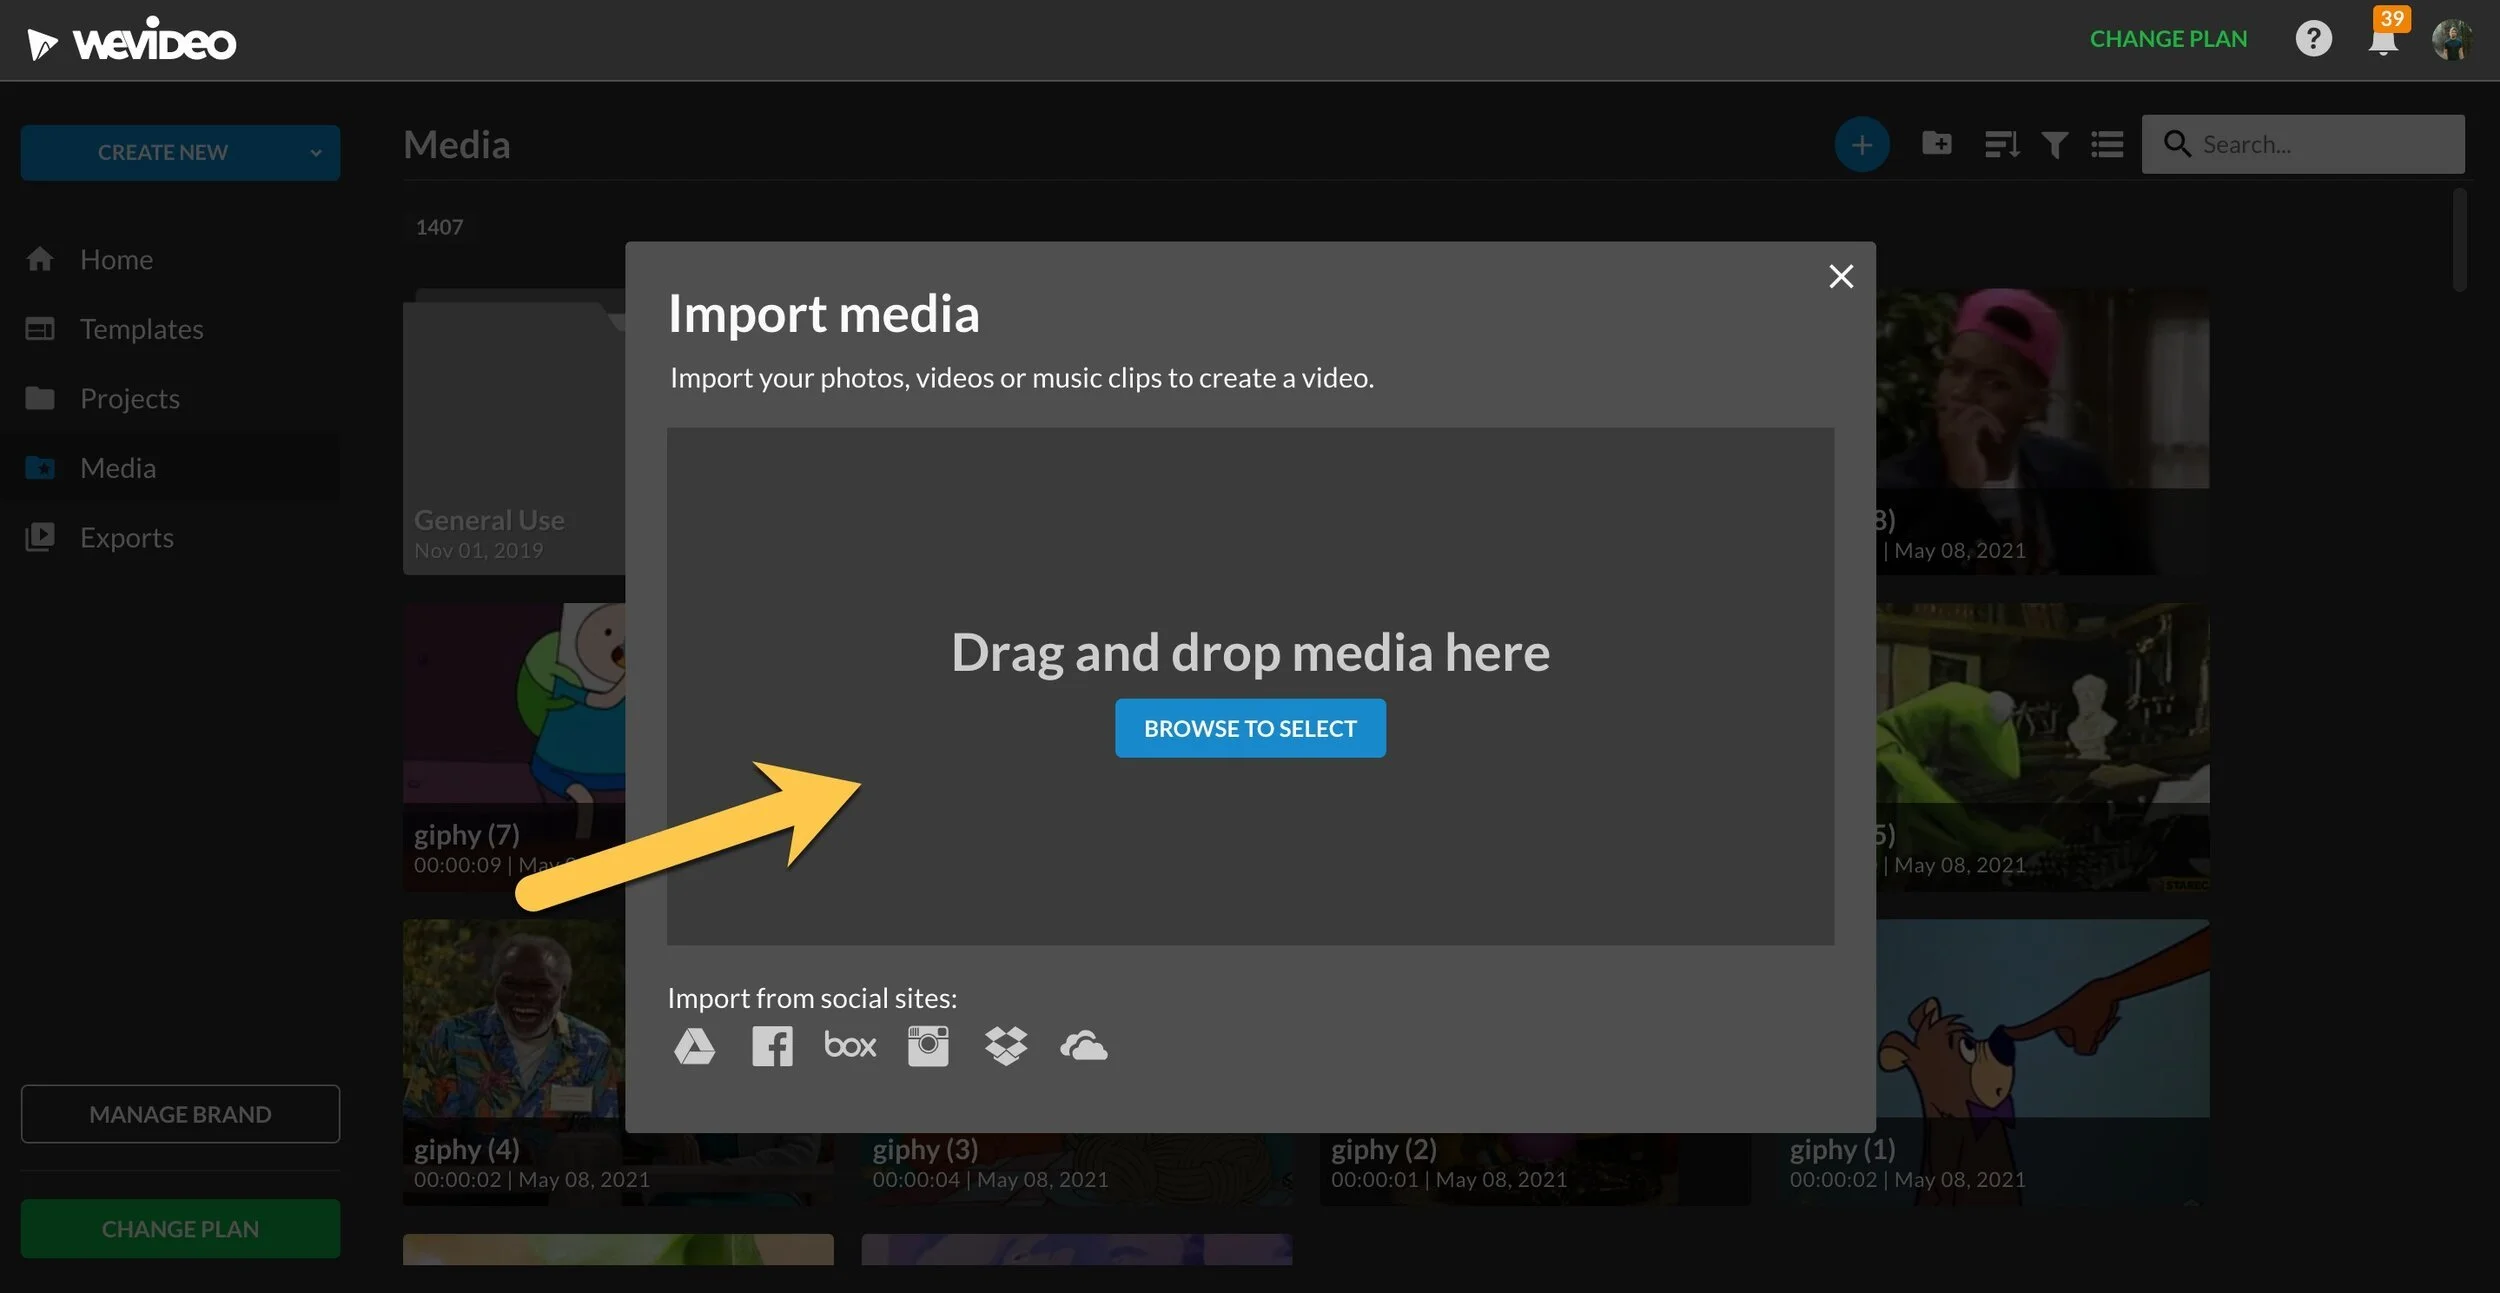
Click the "plus icon"
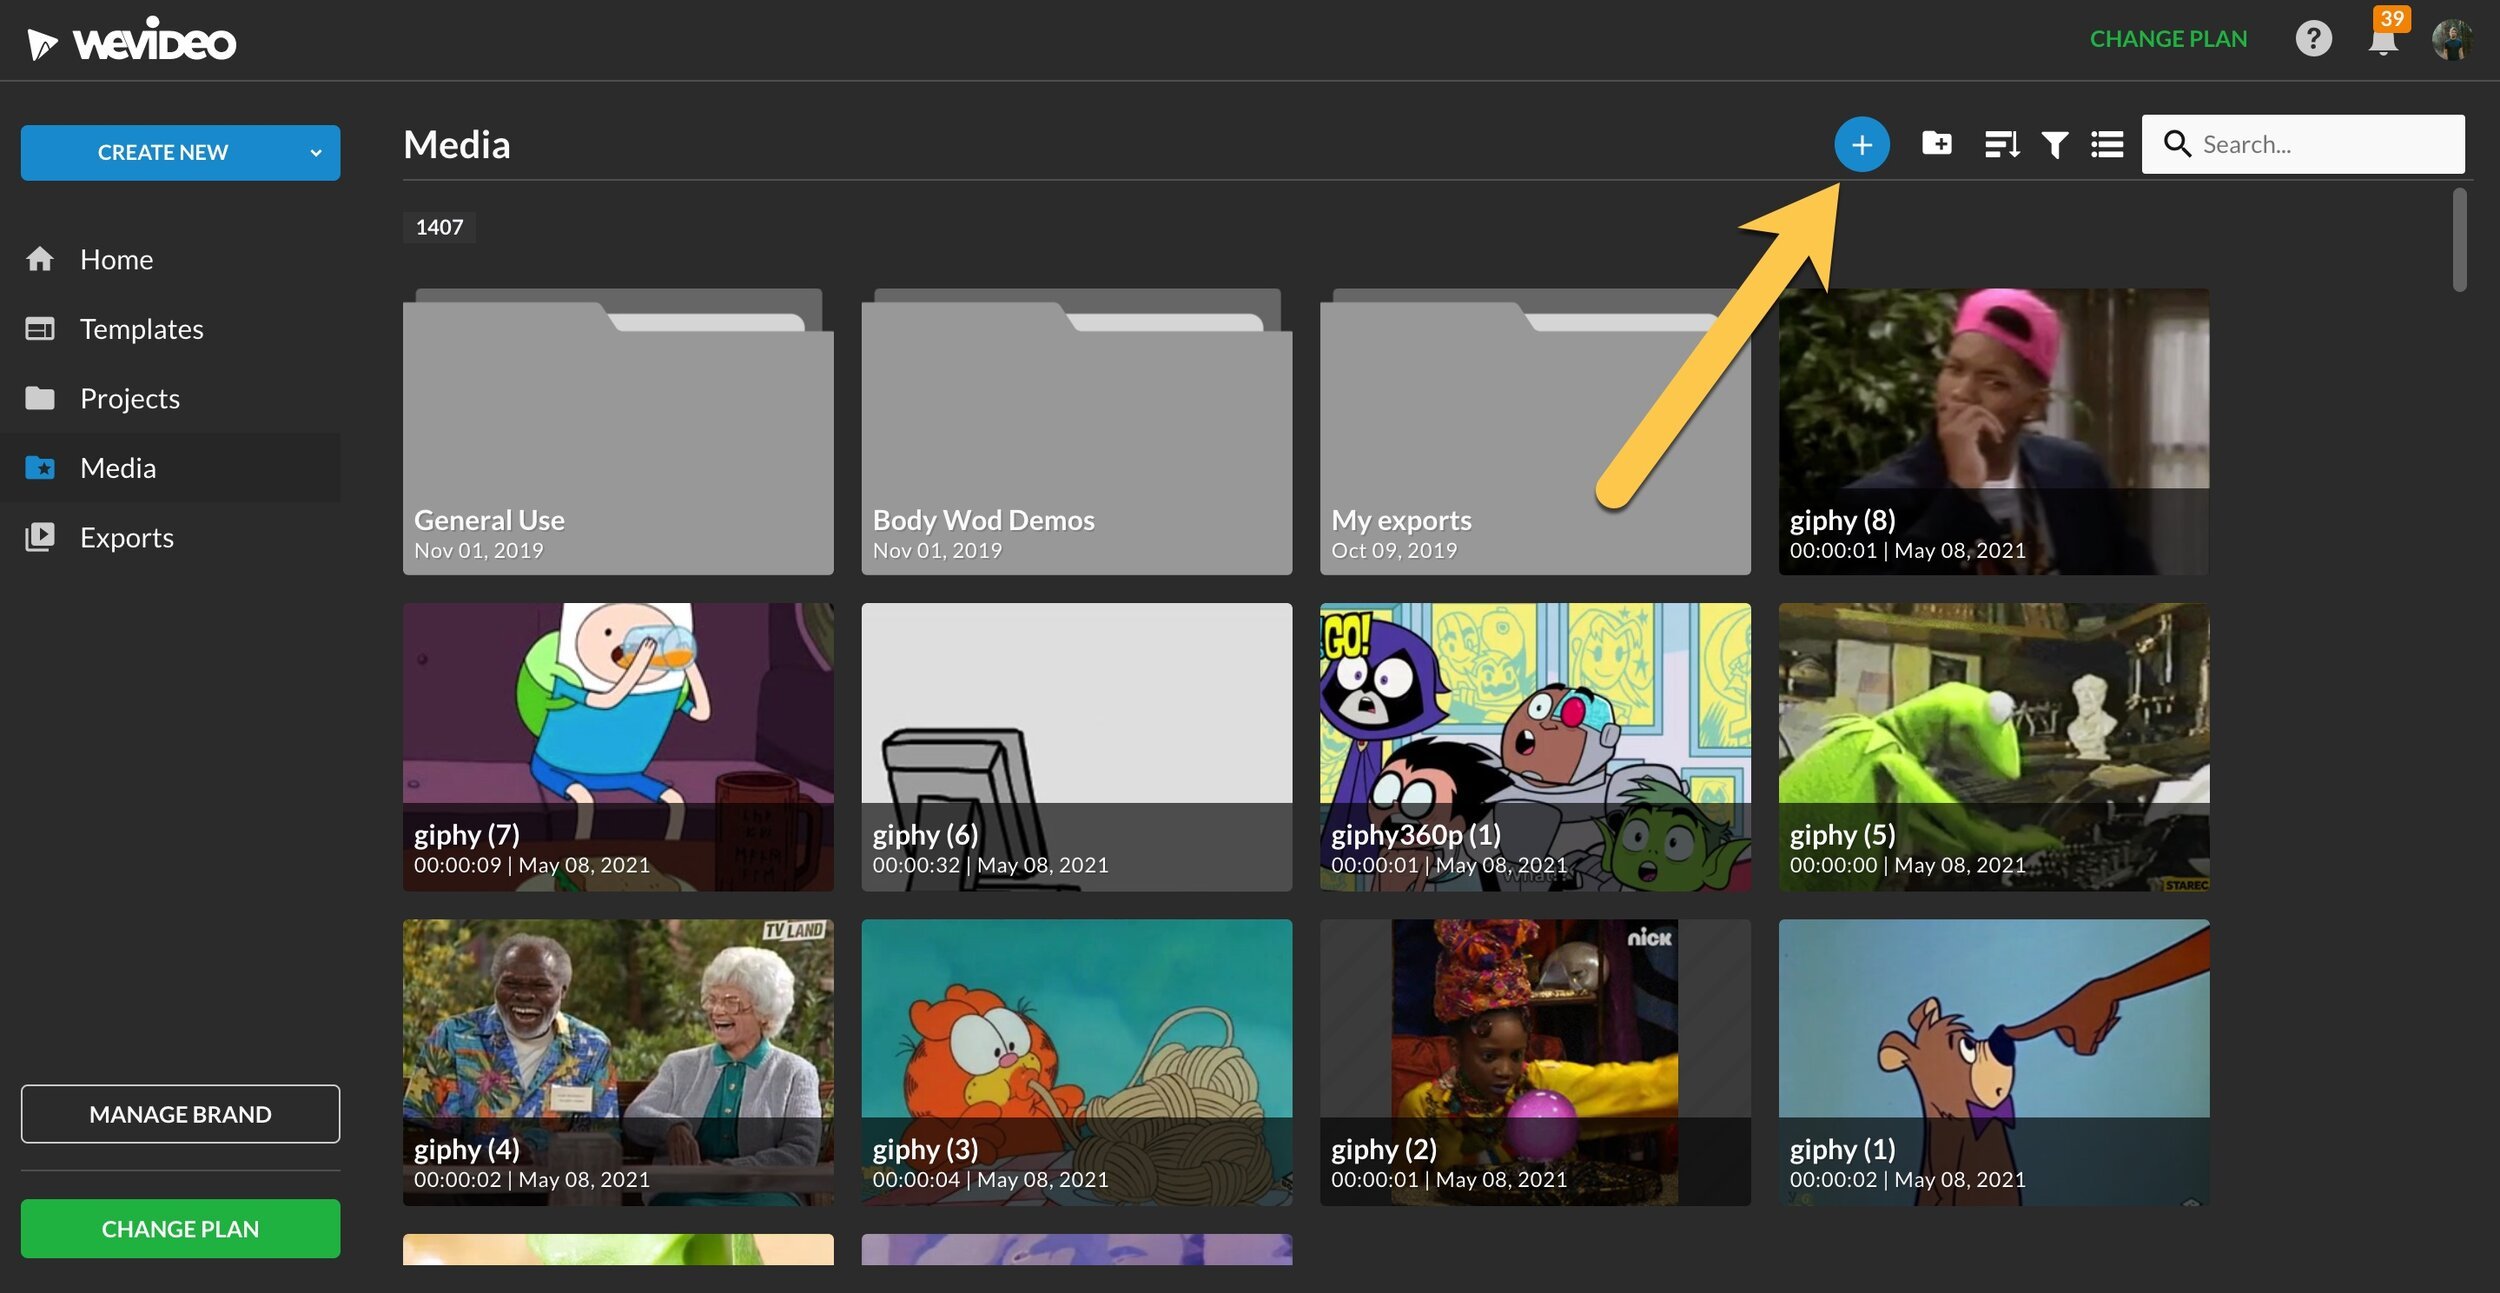
Drag and drop your footage into the upload box.
Creating A New Project in WeVideo
Now, click "create new", and hover over the arrow next to "video" . You will notice you can edit footage in three formats, landscape, vertical, and square.
All Youtube videos are in landscape, and many social platforms like Instagram, show videos in square or vertical format. TikTok videos are usually edited in vertical.

Always edit in landscape. If you want to later turn your video into a square video it will be much easier if you created it in a landscape format first, but not the other way around.
There are two views for Wevideo the beginner/storyboard, and the expert mode.
You are going to start with “expert” because I am going to walk you through everything, but if you ever want to play around with the other version just click the drop-down hamburger icon in the top left and click "switch to storyboard."

Features of WeVideo
Now take a bit of footage from your media window and drag and drop it onto the timeline.

You'll notice that your footage now appears in the upper right window. Note that the playback here will be at a lower resolution, and it may be delayed sometimes if your internet connection is slow.
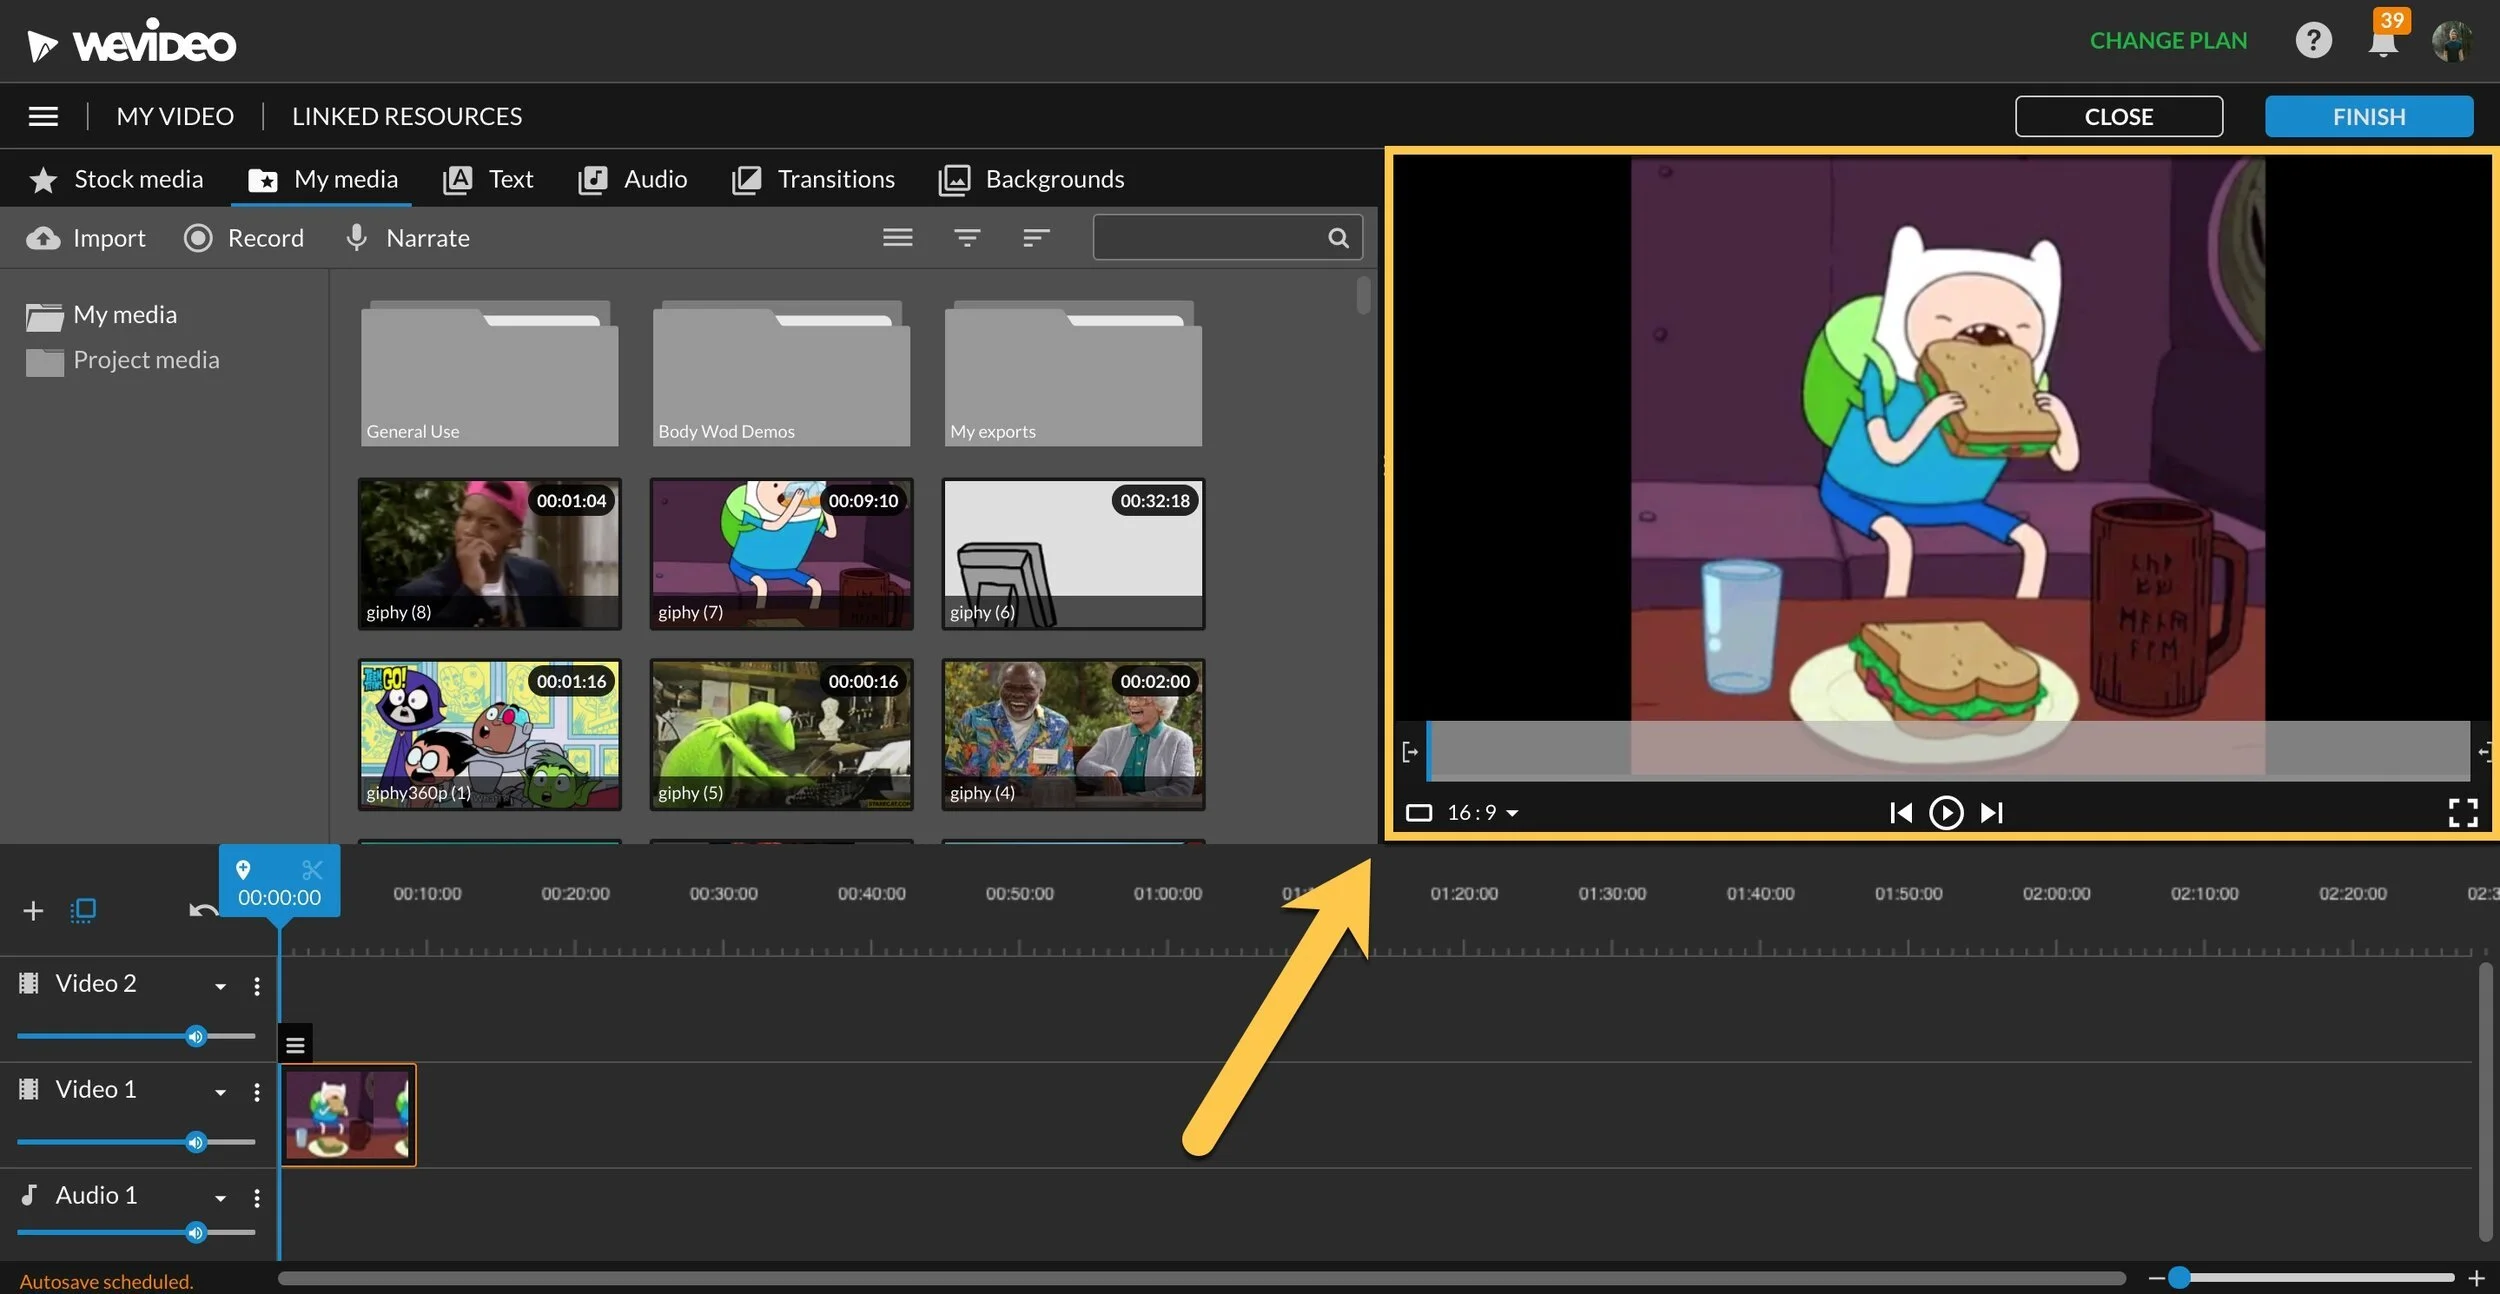
But... I have edited complete videos on a Chromebook while traveling and still gotten the job done, so your good I promise.
If you double click on your footage on your timeline you will notice a few ways you can adjust your clip. I'm not going to go too much into these, but I'll just give you a brief overview.
This is all stuff you will want to do before you cut sections of your clip because it will save you a ton of time later on.
You change the size of a clip with this control icon.

You can crop your clip in the next section over.

You can adjust your audio levels if your video is too quiet or loud.

You can animate your clip meaning you allow it to zoom in or out.

You can adjust your color levels.
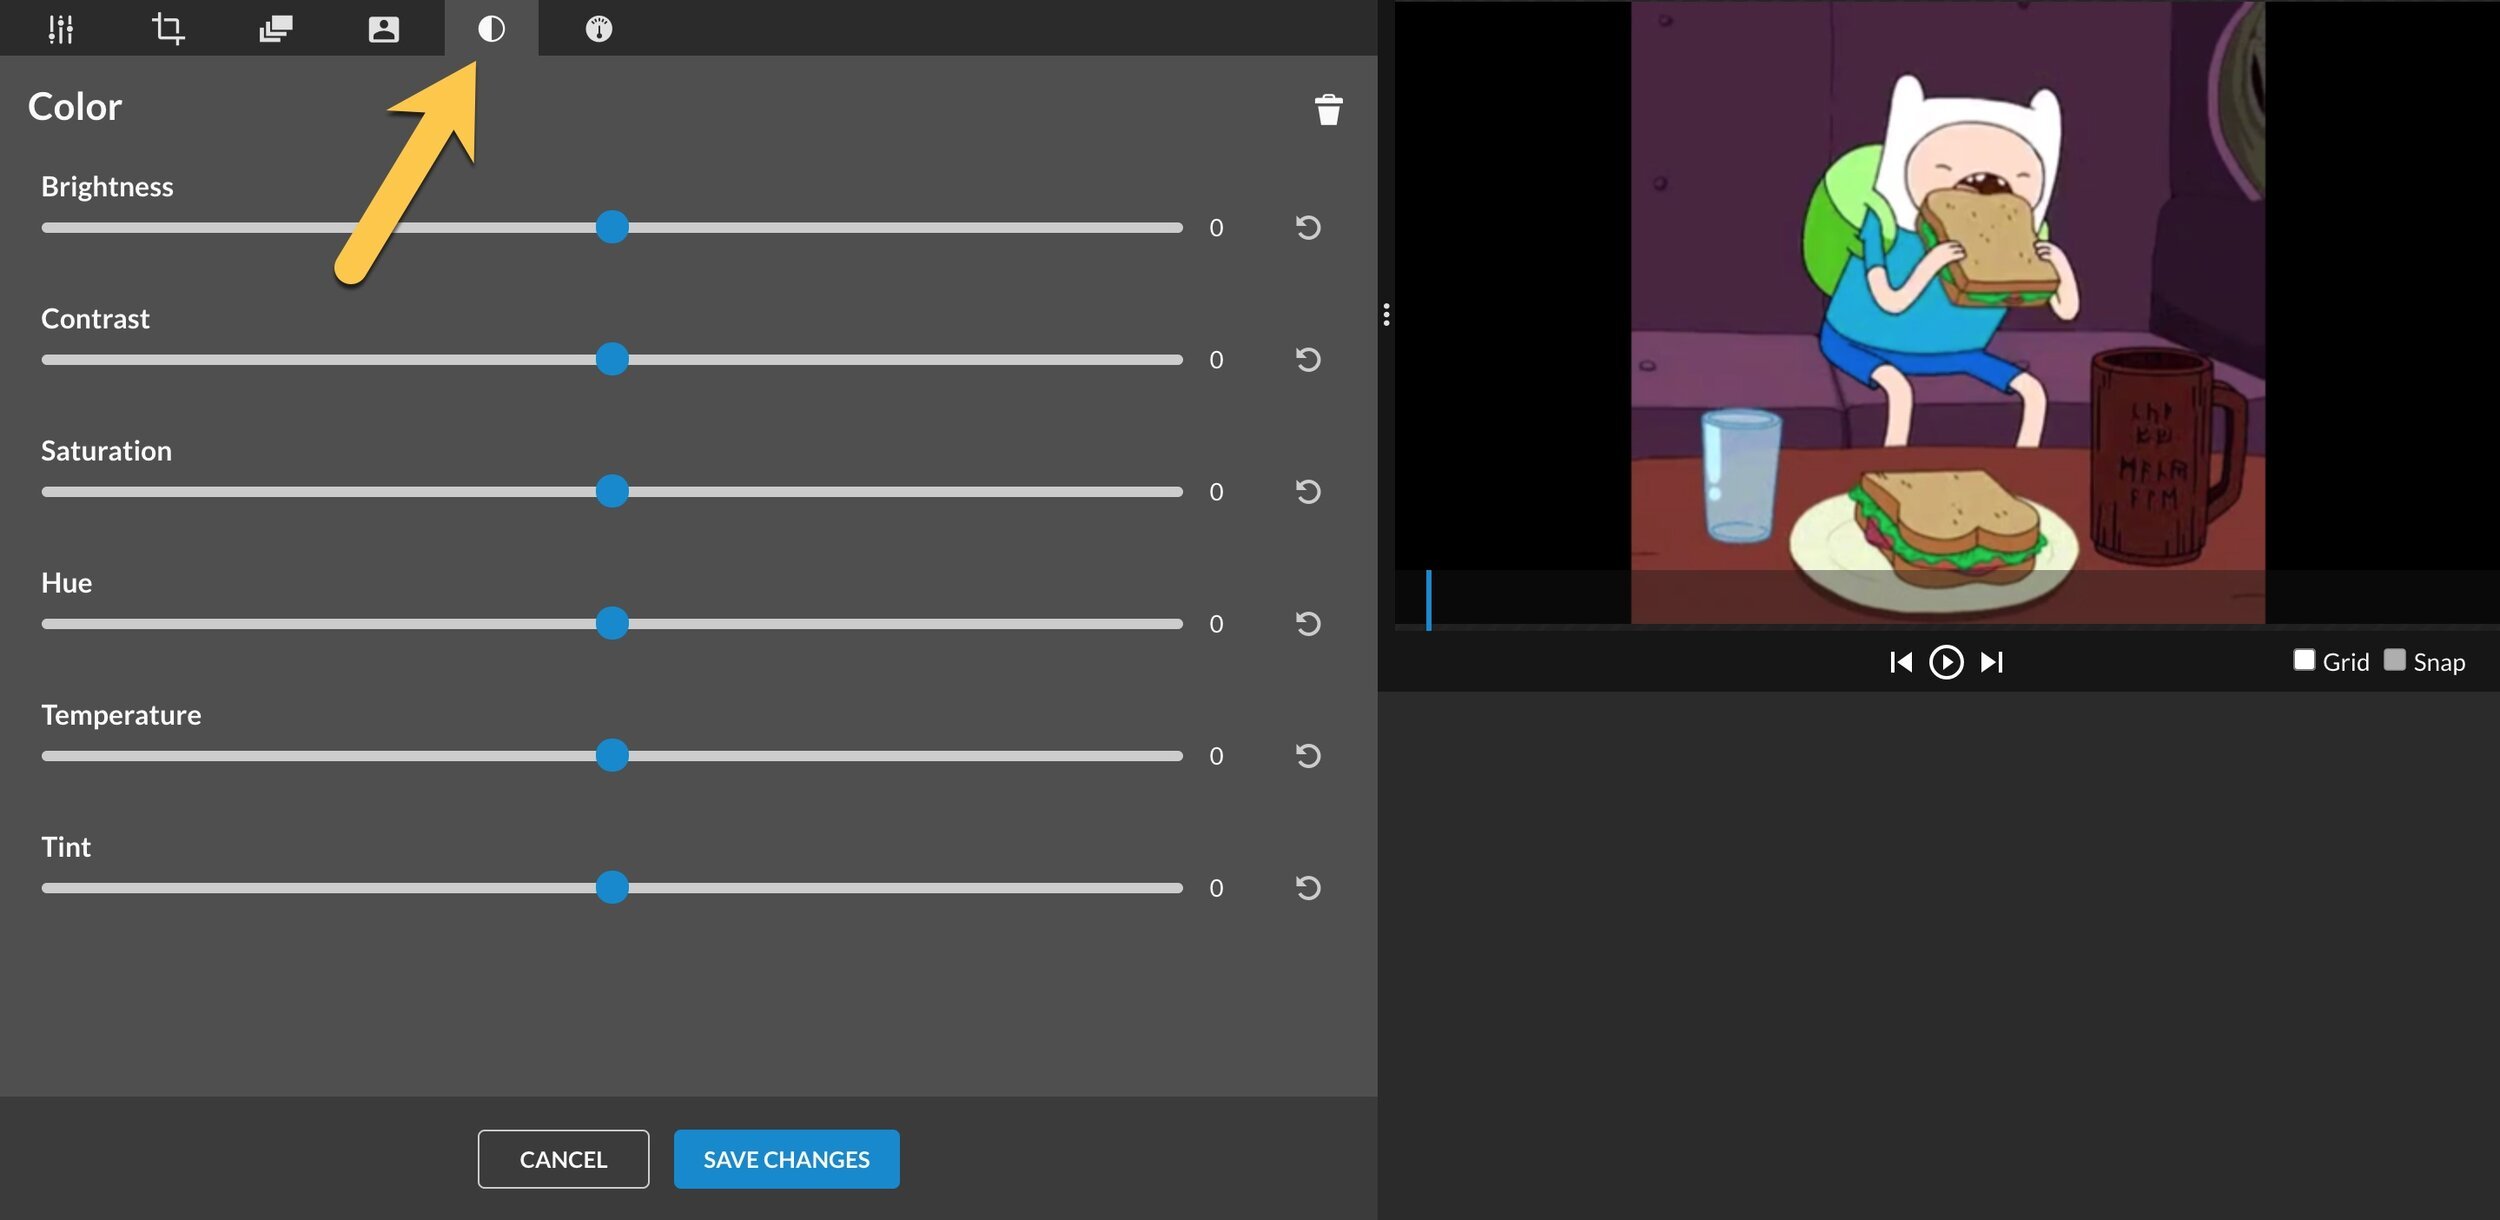
You can color key, which is helpful if you are using something like a green screen where you would like to take one color out of a clip.

Last, you can speed up or slow down your clip too.

Editing your Video with WeVideo
Next, click the drop-down arrow at the beginning of your timeline and click the largest rectangle to expand your track height.

This allows you to see sound which will be essential to editing and will make it much easier to edit between clips.

Spaces, where things are just a flat line, are dead footage where you are not saying anything. You want to cut this stuff out.

When you film you should keep filming a section until you like the way it looks and sounds. This means that your last take will always be your best take. Therefore, we are going to edit from the end of your clip to the beginning.
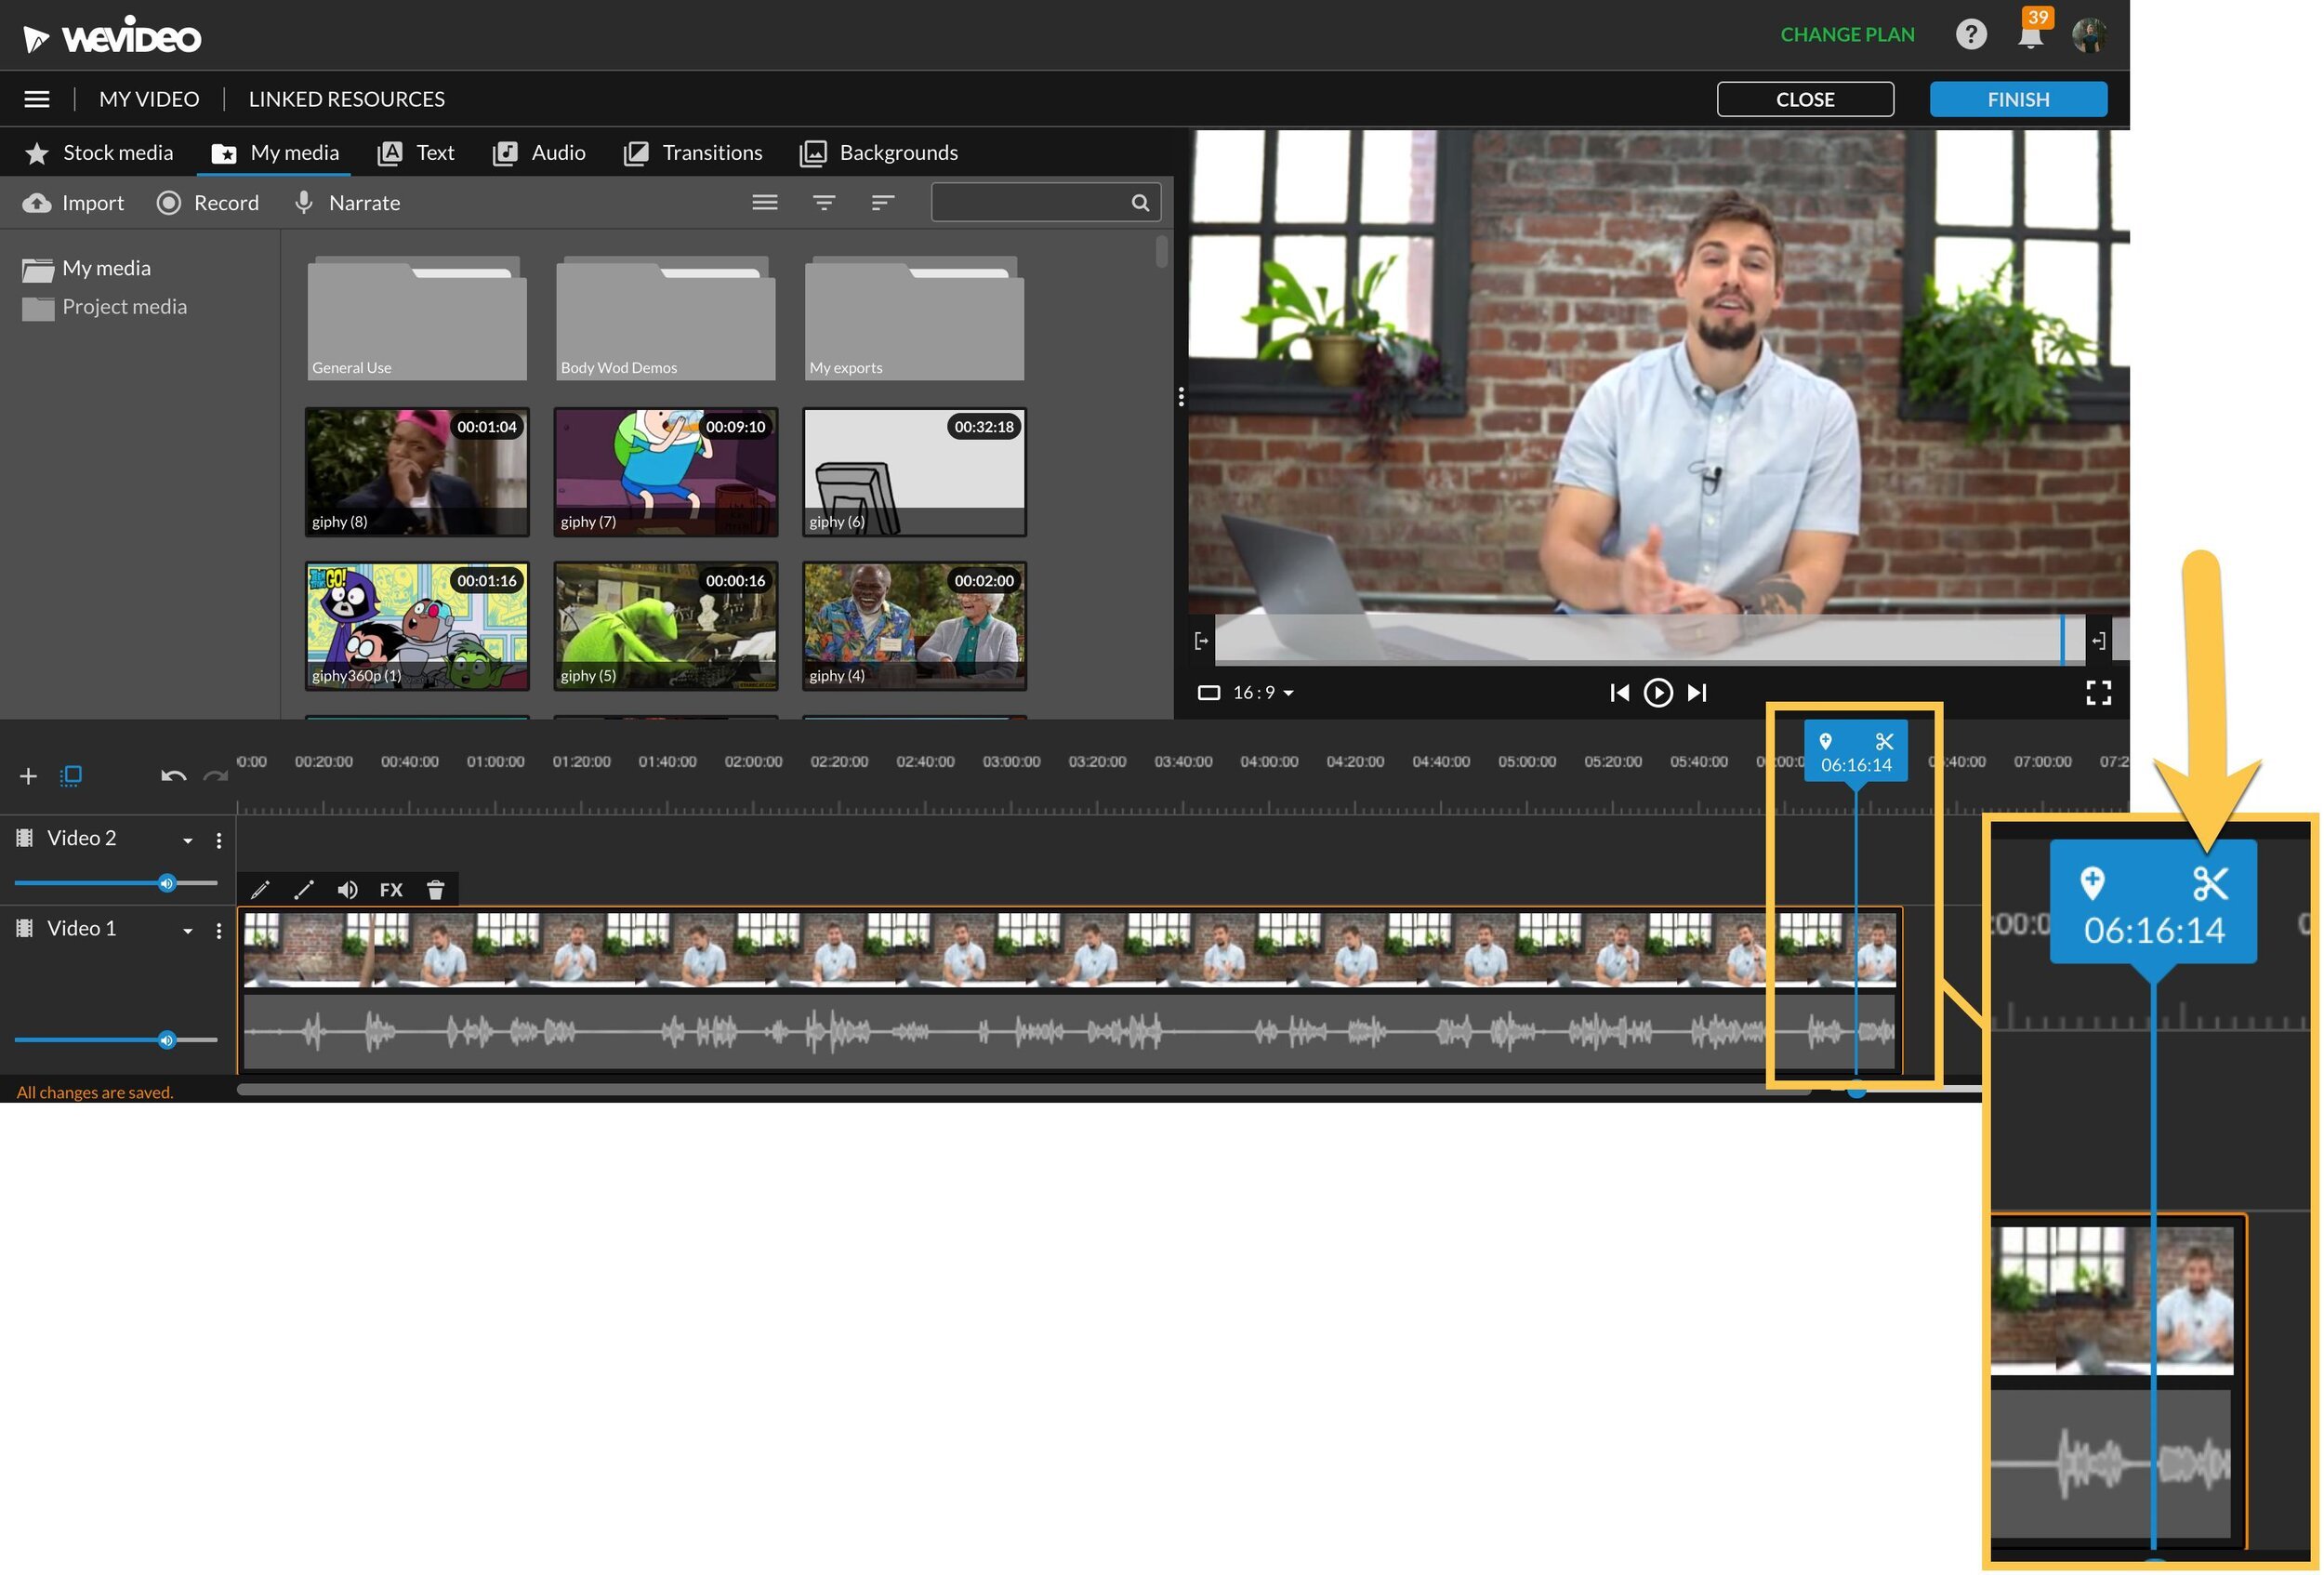
Click on your timeline towards the end and you'll notice the click is now highlighted and a blue place bar shows you where the video will start playing from.
You can drag and slide the place bar to start at different sections, and you'll notice that the video in your playback area will respond to where you drag it.

Again, start the place bar toward the end of the clip and press the play button in the upper right-hand window. Then pause the video after you have said your last line.

Go to the place bar and click the scissor icon. You have now just made your first cut. Click the cut piece and press delete.
Now we need to create a cut to right before you start speaking. Take the place bar and drag it over the very beginning of the audio for that section.
What you looking for in the playback window is for your lips to begin opening. Once you click on a clip you can also use your left and right arrows to find the exact right place you want to make a cut.
When you are satisfied click the blue place bar and again click the scissor icon. Boom. Now you have a complete clip featuring only the good stuff.
Chances are you will mess up in where you make your cuts in this process. Here is how to save a bunch of time.
If you completely goof press “control Z” and this will undo your last edit. Or you can click the undo icon at the beginning of the timeline too.

There will be times where you want to make a surgical cut in the footage, but it might be hard to see from your viewpoint. Use the slider on the bottom right to zoom in or out on your footage.

It's easier to make accurate cuts when you are zoomed in closer, and it's easier to move things around or see a sequence when you are zoomed out.

You can also adjust the length of your clip by clicking the edge of a clip and sliding it longer or shorter. This can be helpful if you cut too much footage off.
Complete this process until you have all the essential footage you want to use in the piece.
Adding graphics, B-Roll, and Other Footage.
You're going to want to add some stuff to engage your audience during your video and there are a few great free things you can use.
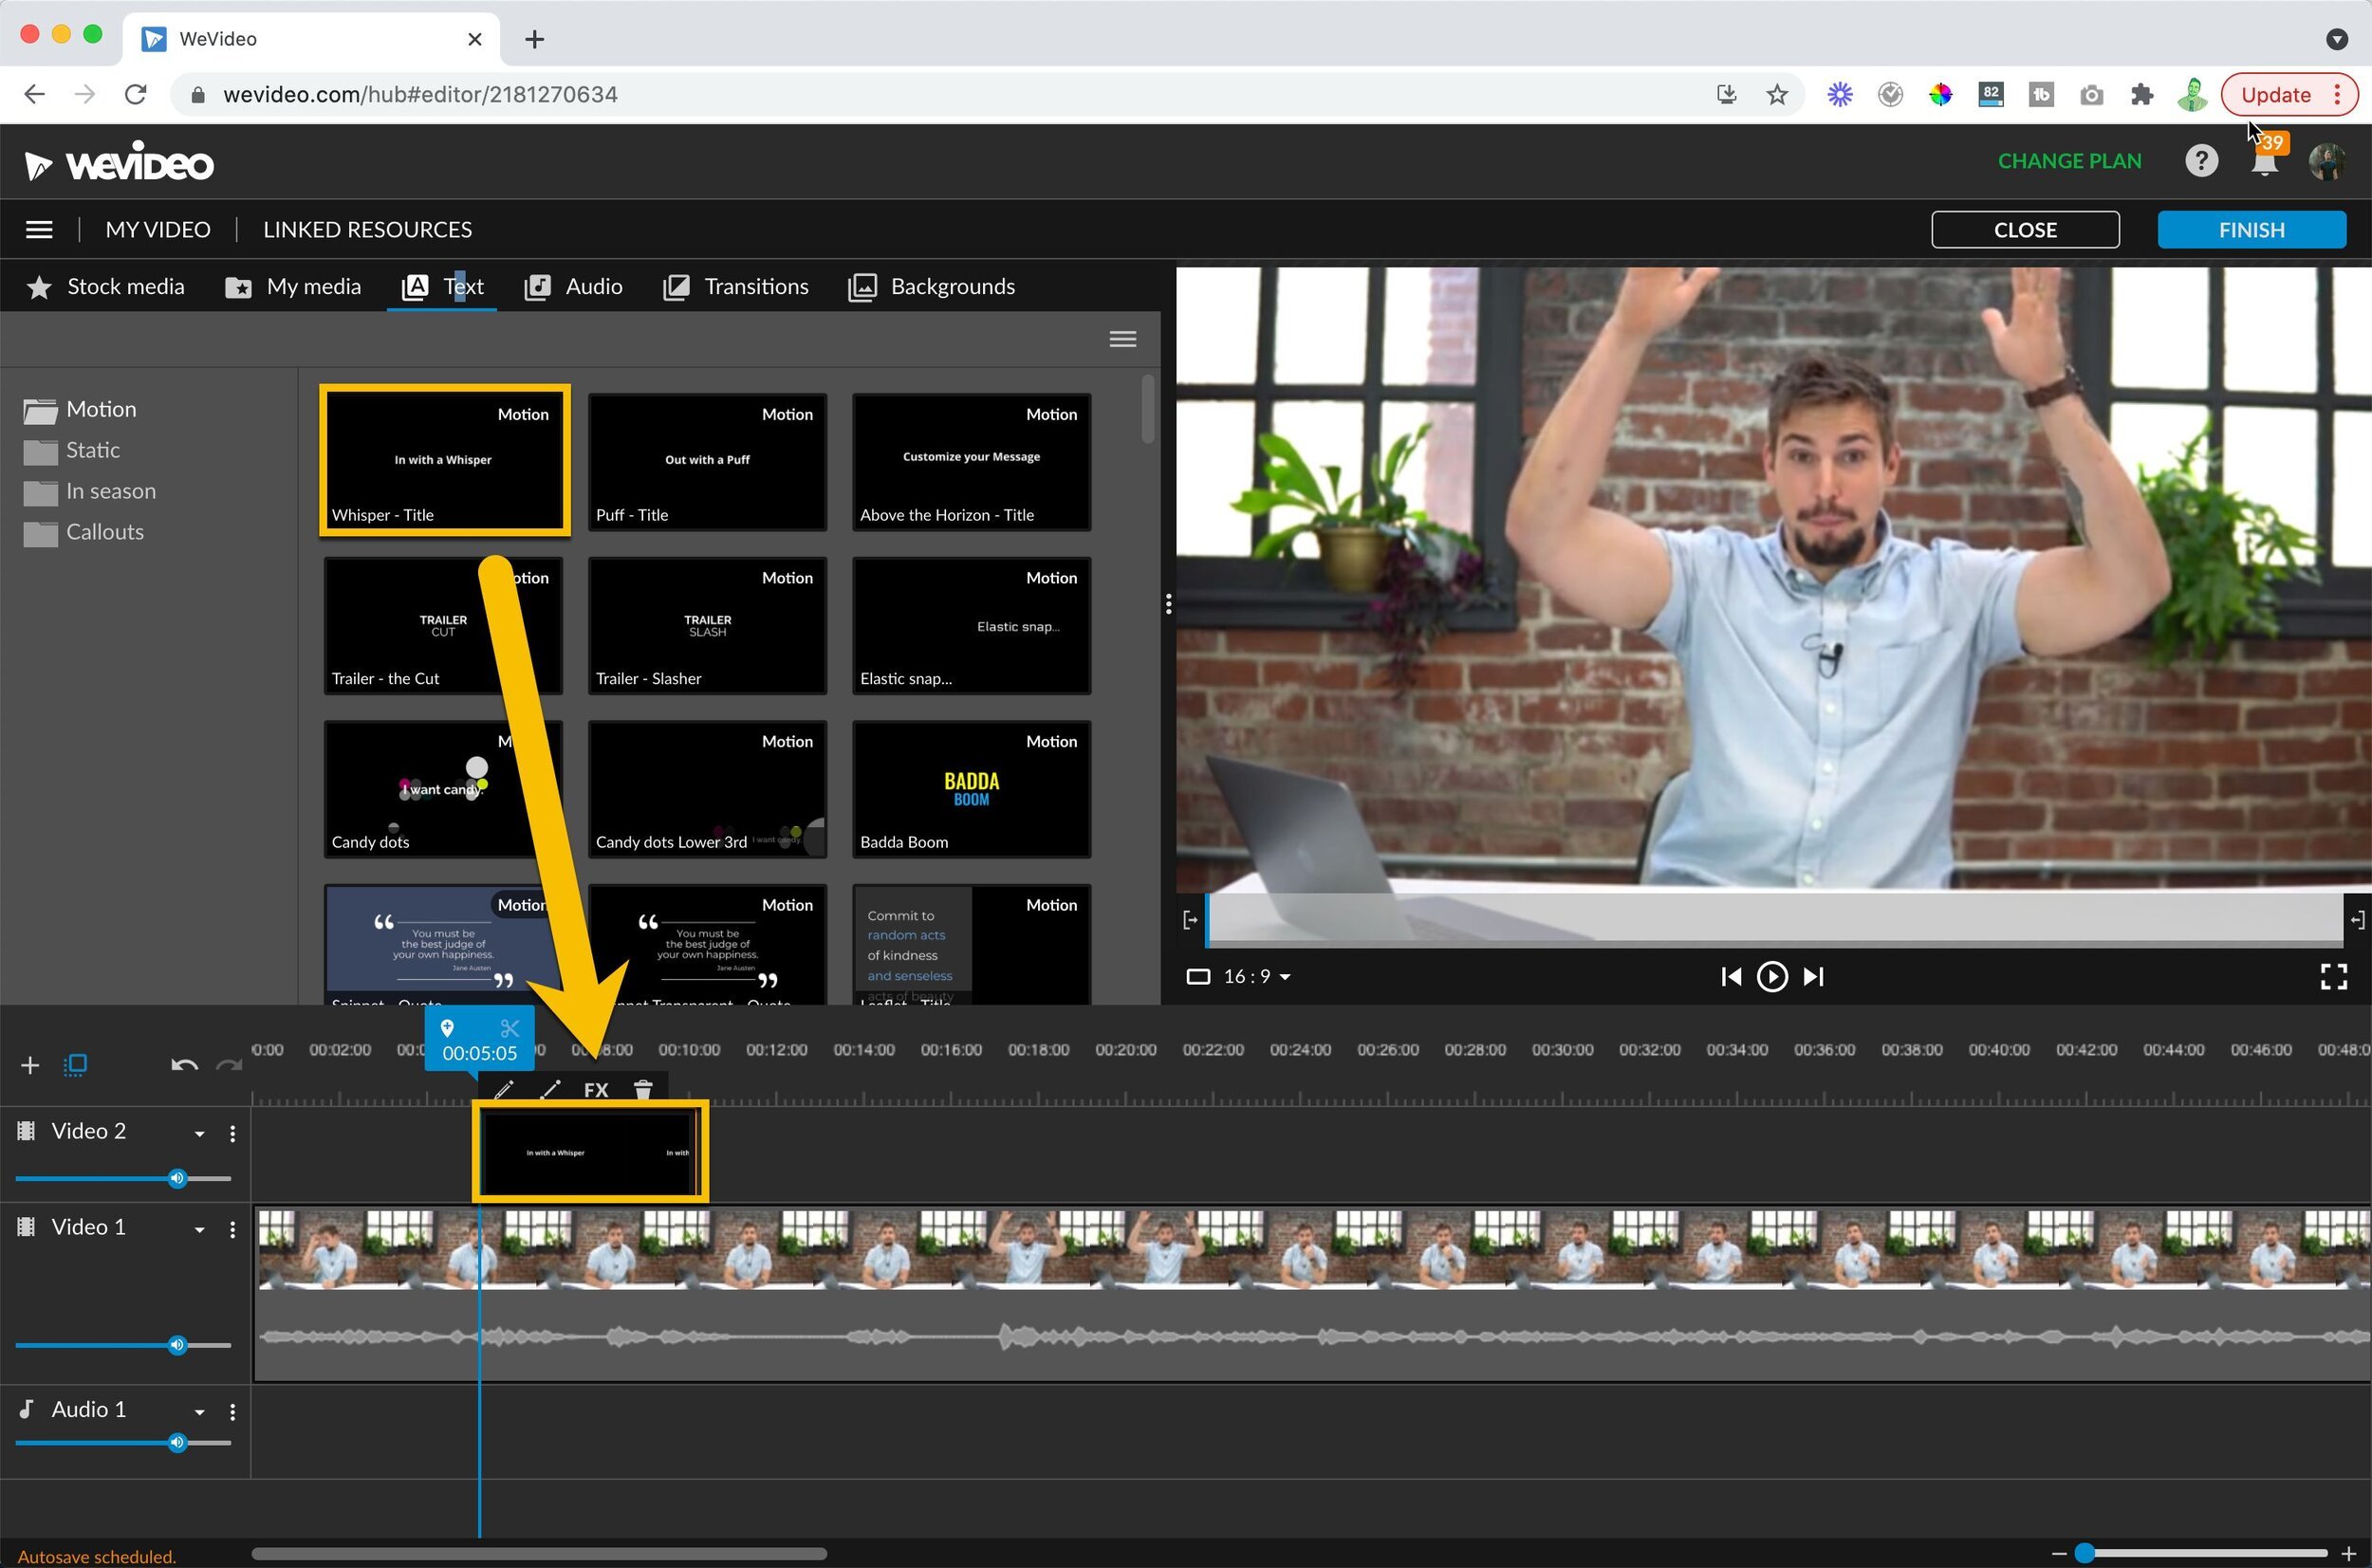
If you want to overlay some text on your footage then click the “text” icon.

Here you have a selection of motion or static graphics to choose from. If you double click an option it will show you what it looks like in the playback window.

When you find some text you like click it and drag it above the section you want it to play over on your main timeline.
Remember that you can click the edges of the clip to make it longer or shorter too.

Double text clip to adjust the color, font, and size. For color, you can always drop in your specific hex code. WeVideo doesn't have every font on the market, but they do have a good selection to choose from.
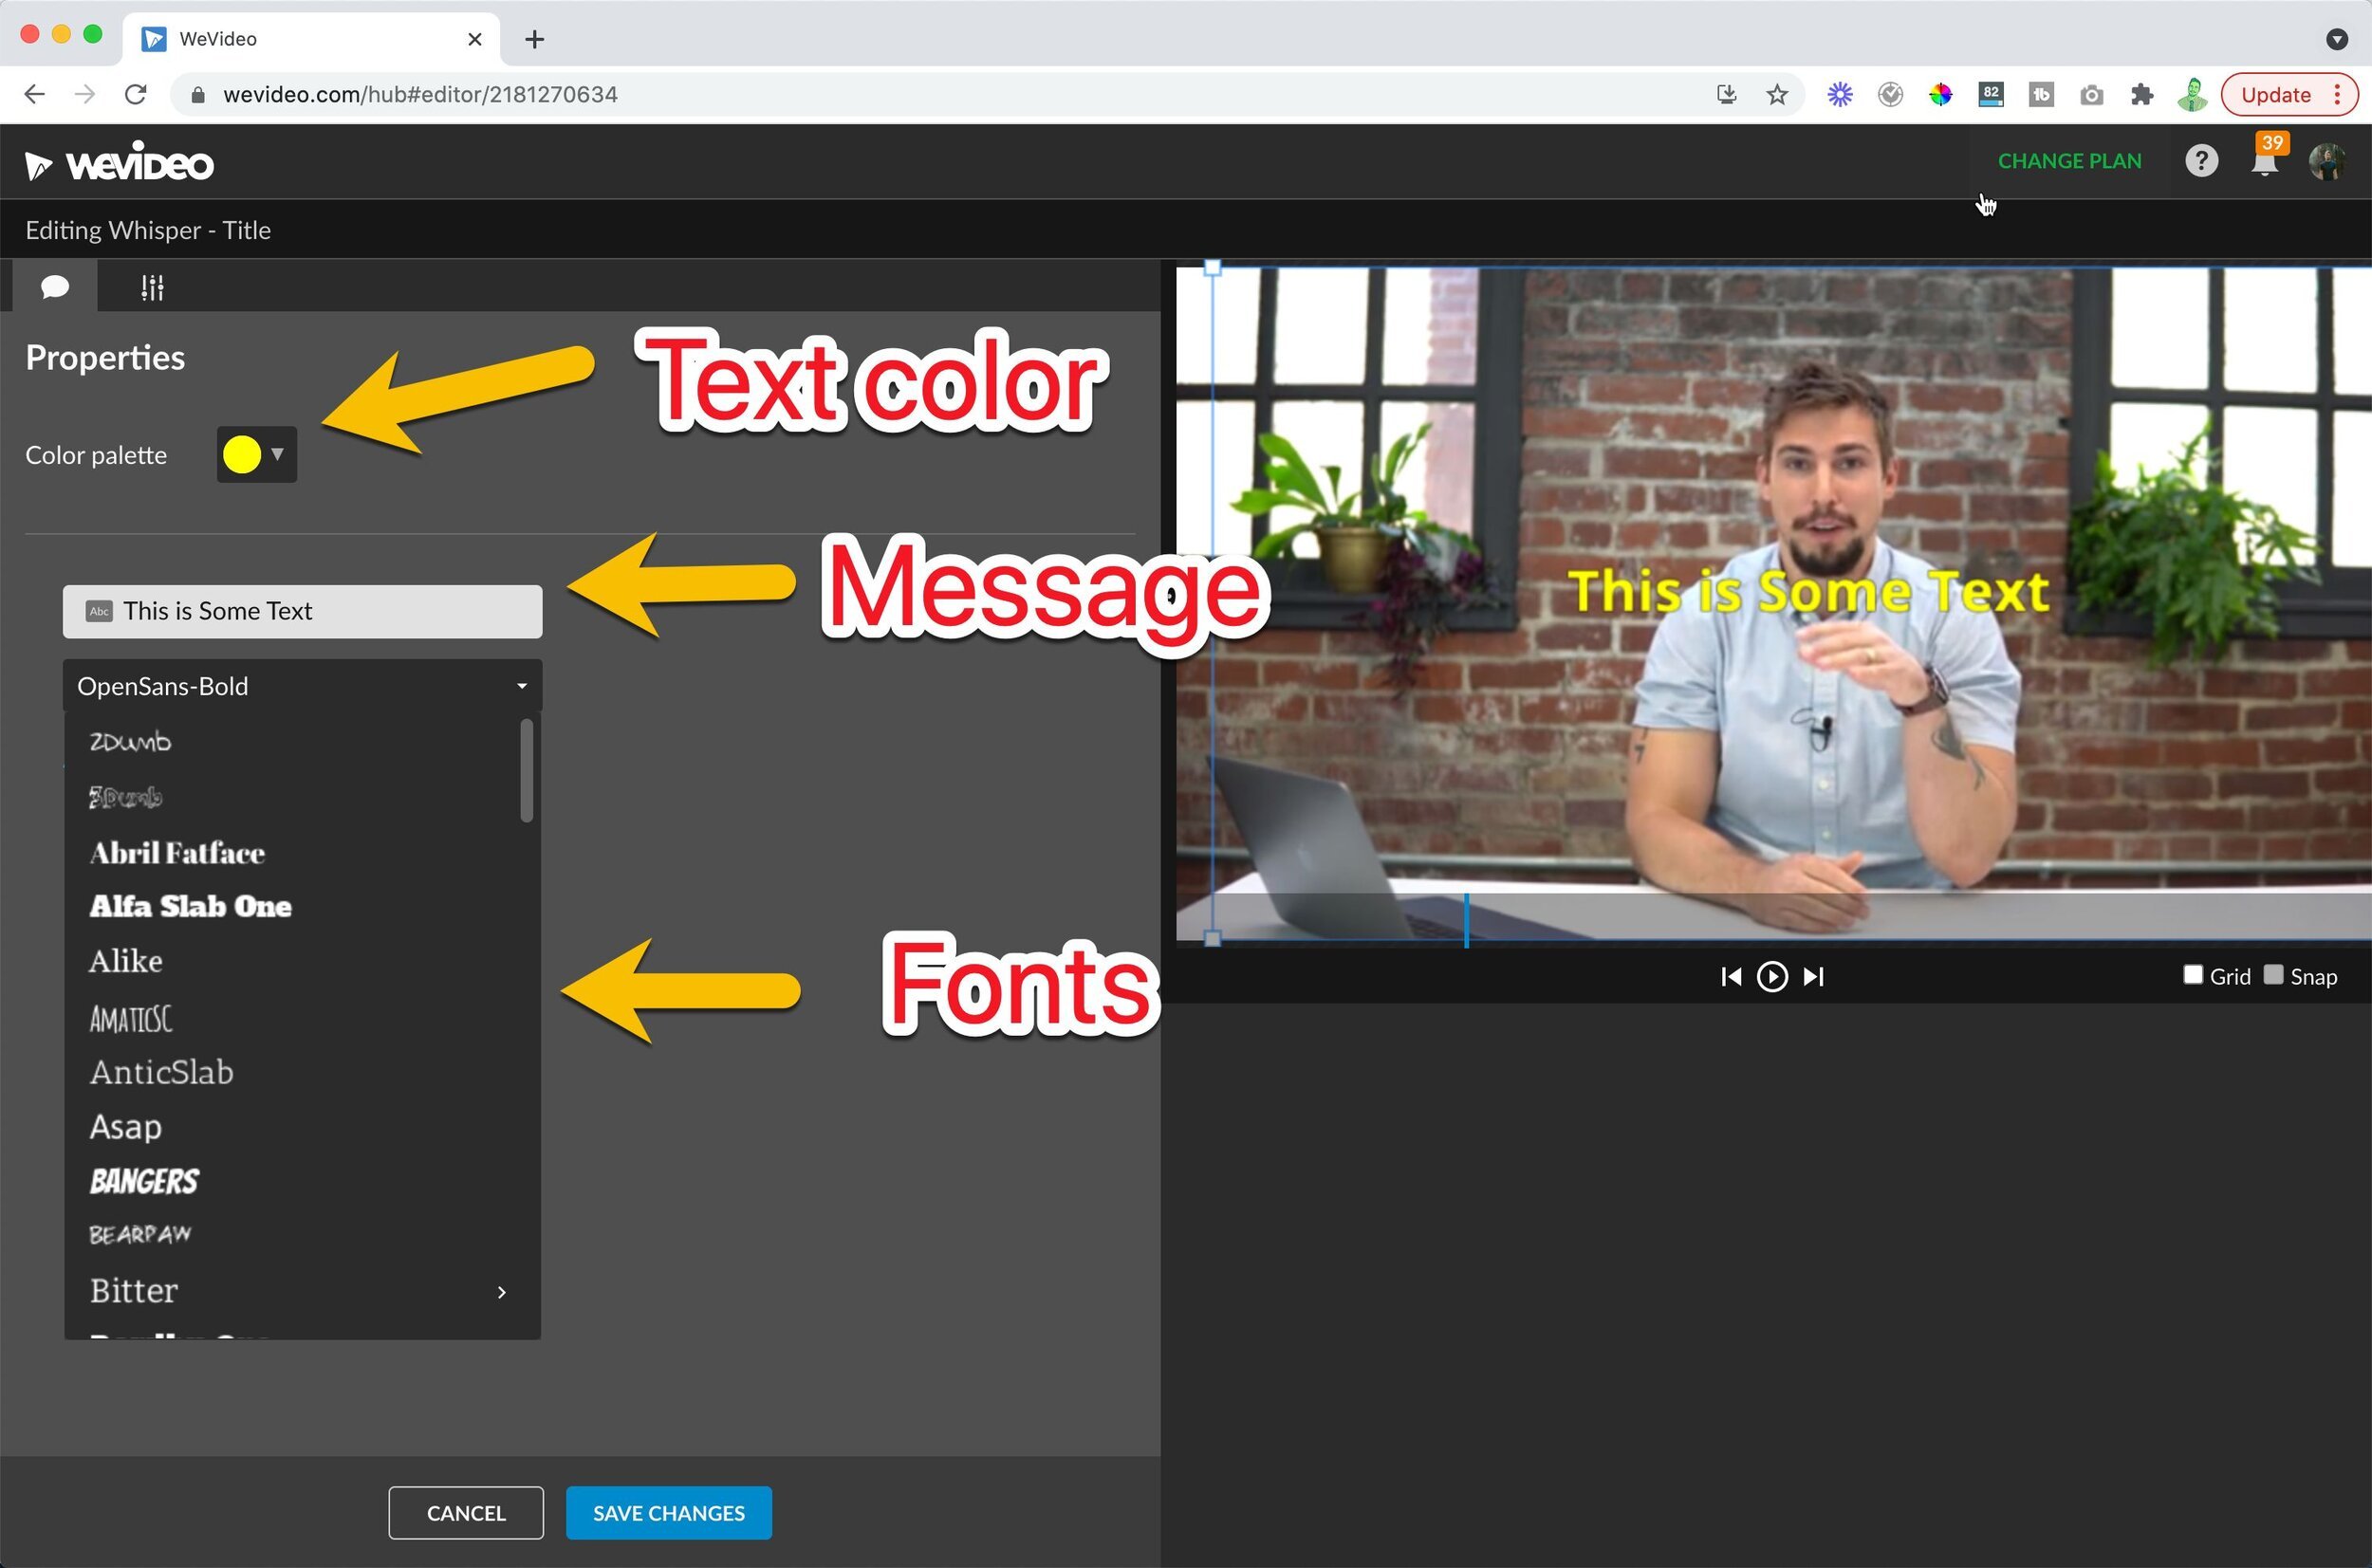
You can also adjust the size and position of your graphic in the display window on the right.

When you are satisfied click “save changes.”
Overlaying other footage and B-Roll
There will be times where you might want to overlay a video of your computer screen, an example of something you are talking about, or a funny gif.
If you shot the footage yourself you can upload it like any other media and drag and drop it onto your timeline and cut and edit accordingly.
If you want to add it to the main timeline you will need to add it in between cuts.

Sidenote you can create as many timelines for video and audio as you want by clicking the "plus icon." in the top left above the video two-track.


Whatever is on the highest track will overlay over the things beneath it.

Wevideo does have a pretty gangster library of b-roll, sound effects, and music that you can pay extra for.
I totally recommend you do it.
You'll save money and time by just using the selection of stuff they provide. Wevideo does provide some stock music options for free, but I'll be honest these are not as great.
You can view and search the library by clicking the star icon next to the text icon. You can add and manipulate any footage here just like you would regular footage.
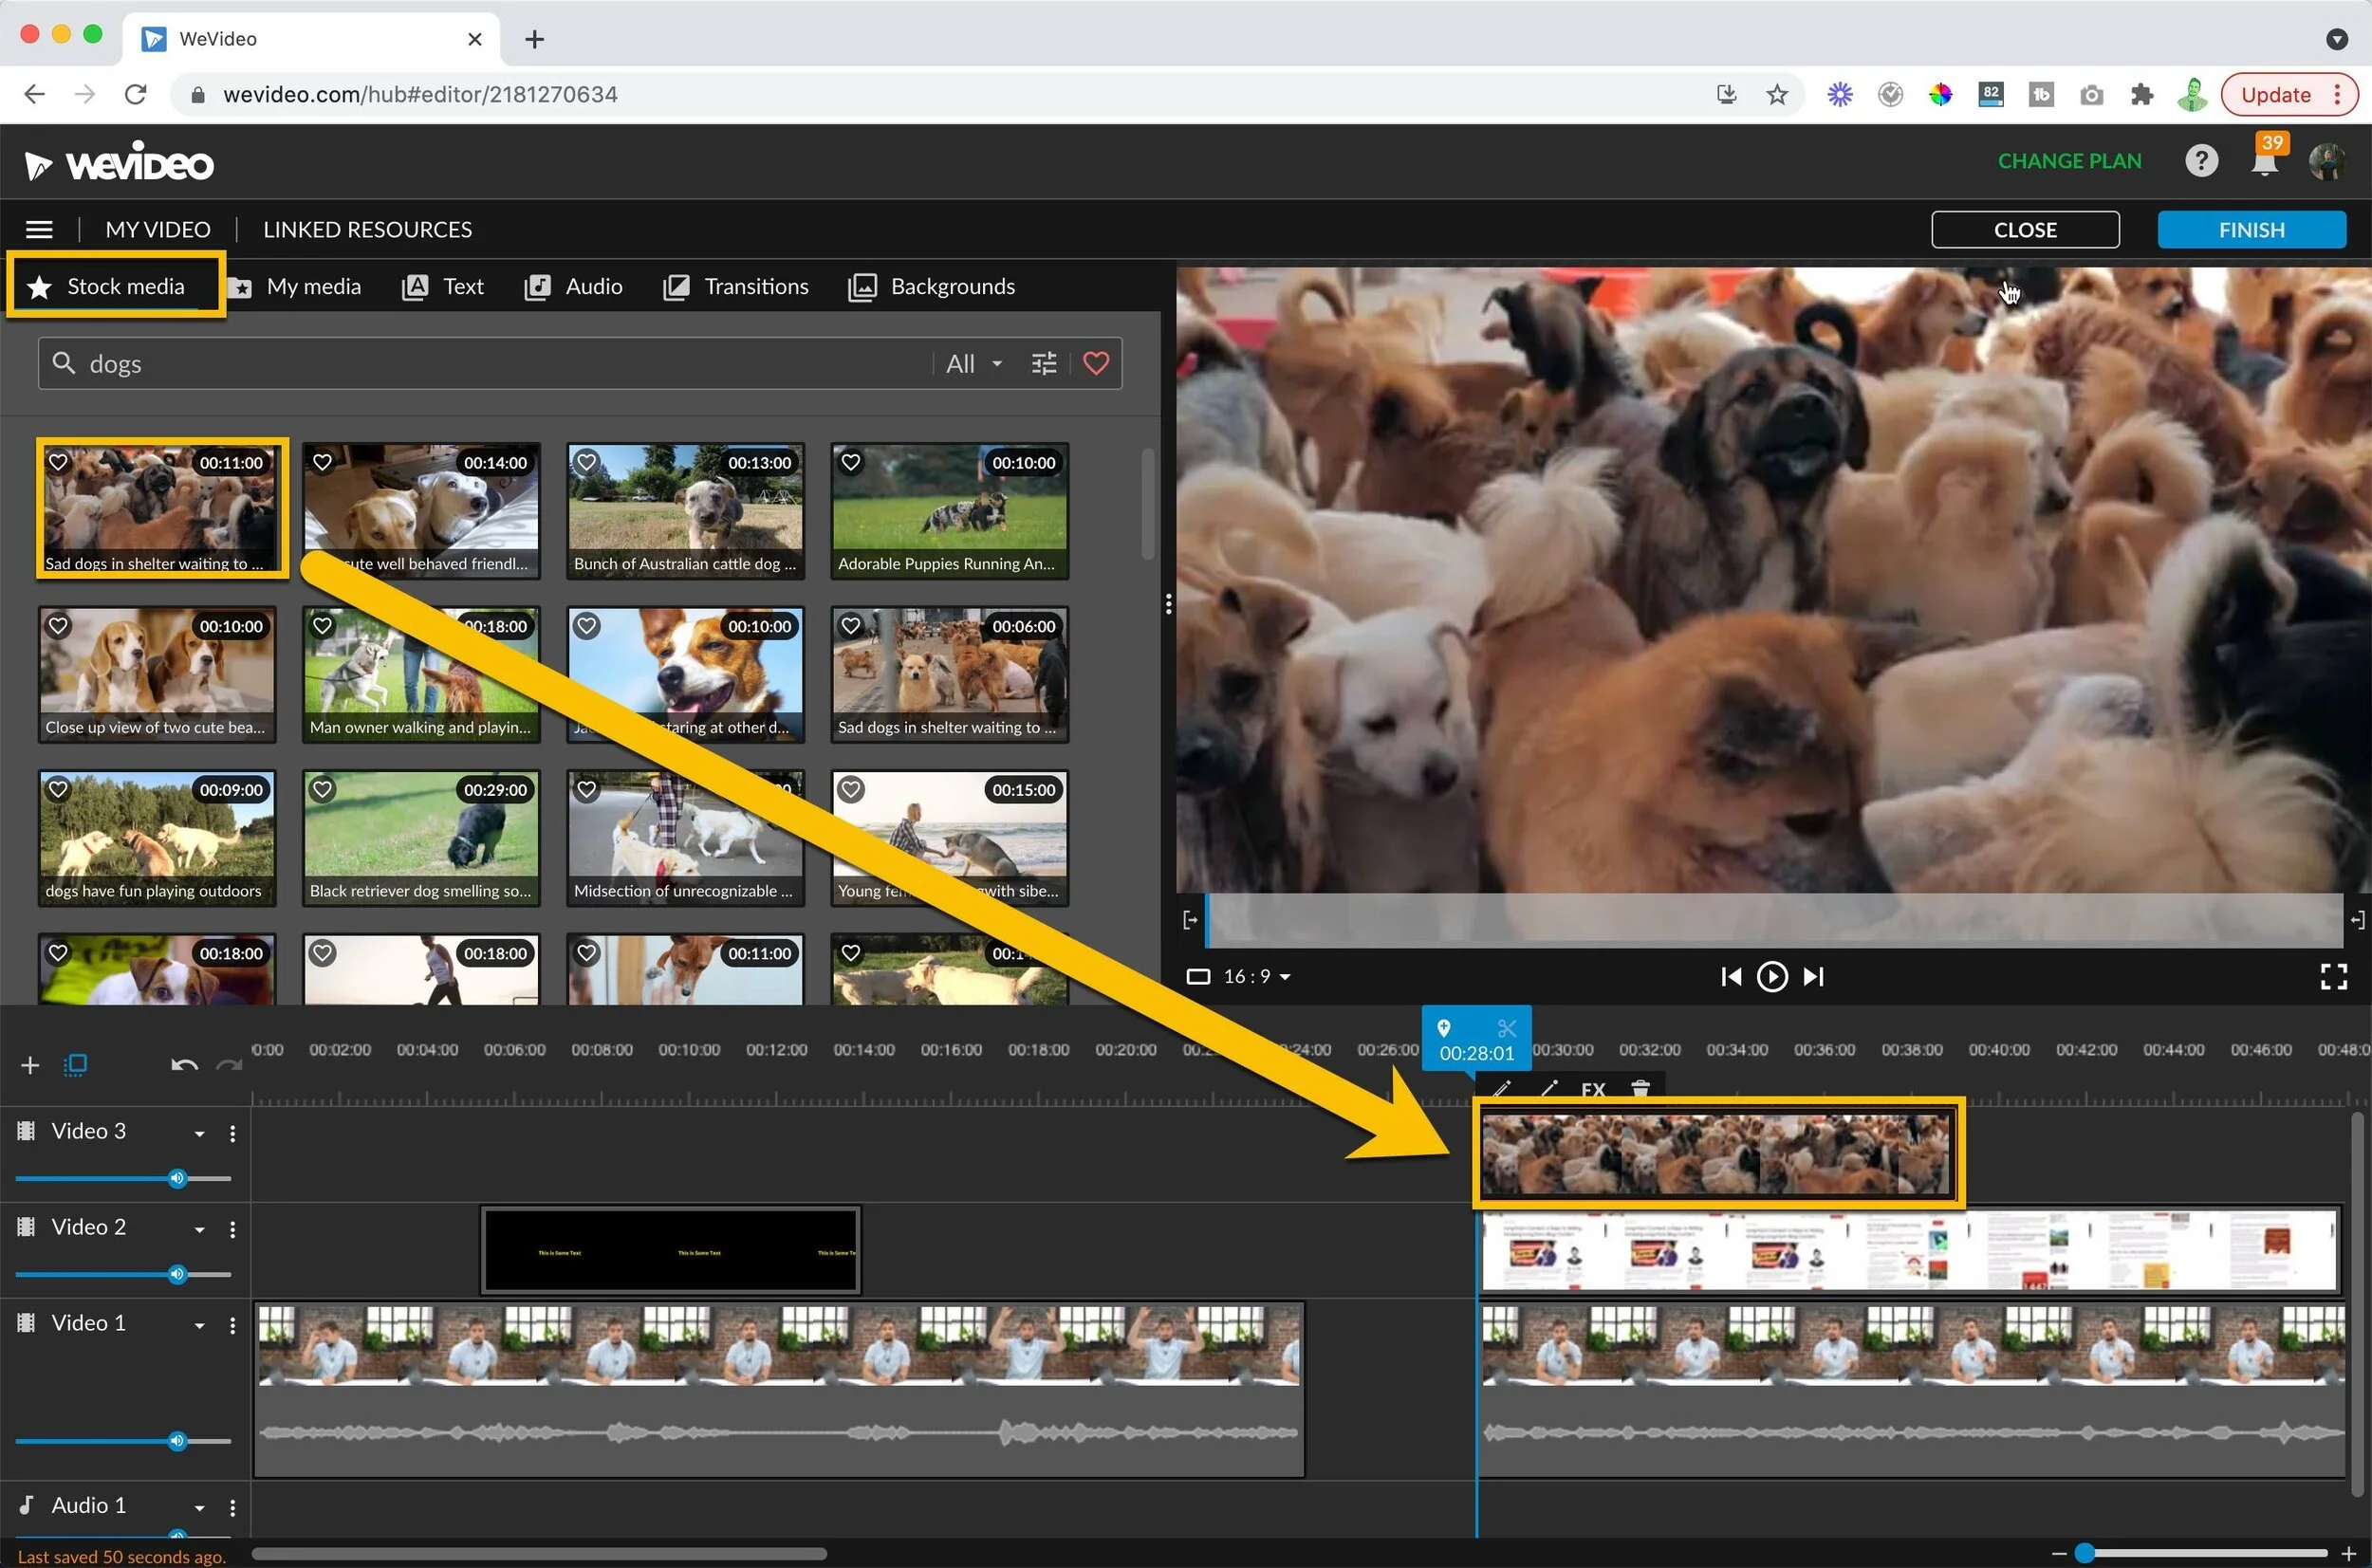
Add sound and music to your clips. Just like adding a video layer you can also add a sound layer. This can be helpful if you have a track that includes sound effects and one track that includes background music.
Drag any audio and put it underneath the section of your main timeline that you would like it to play.

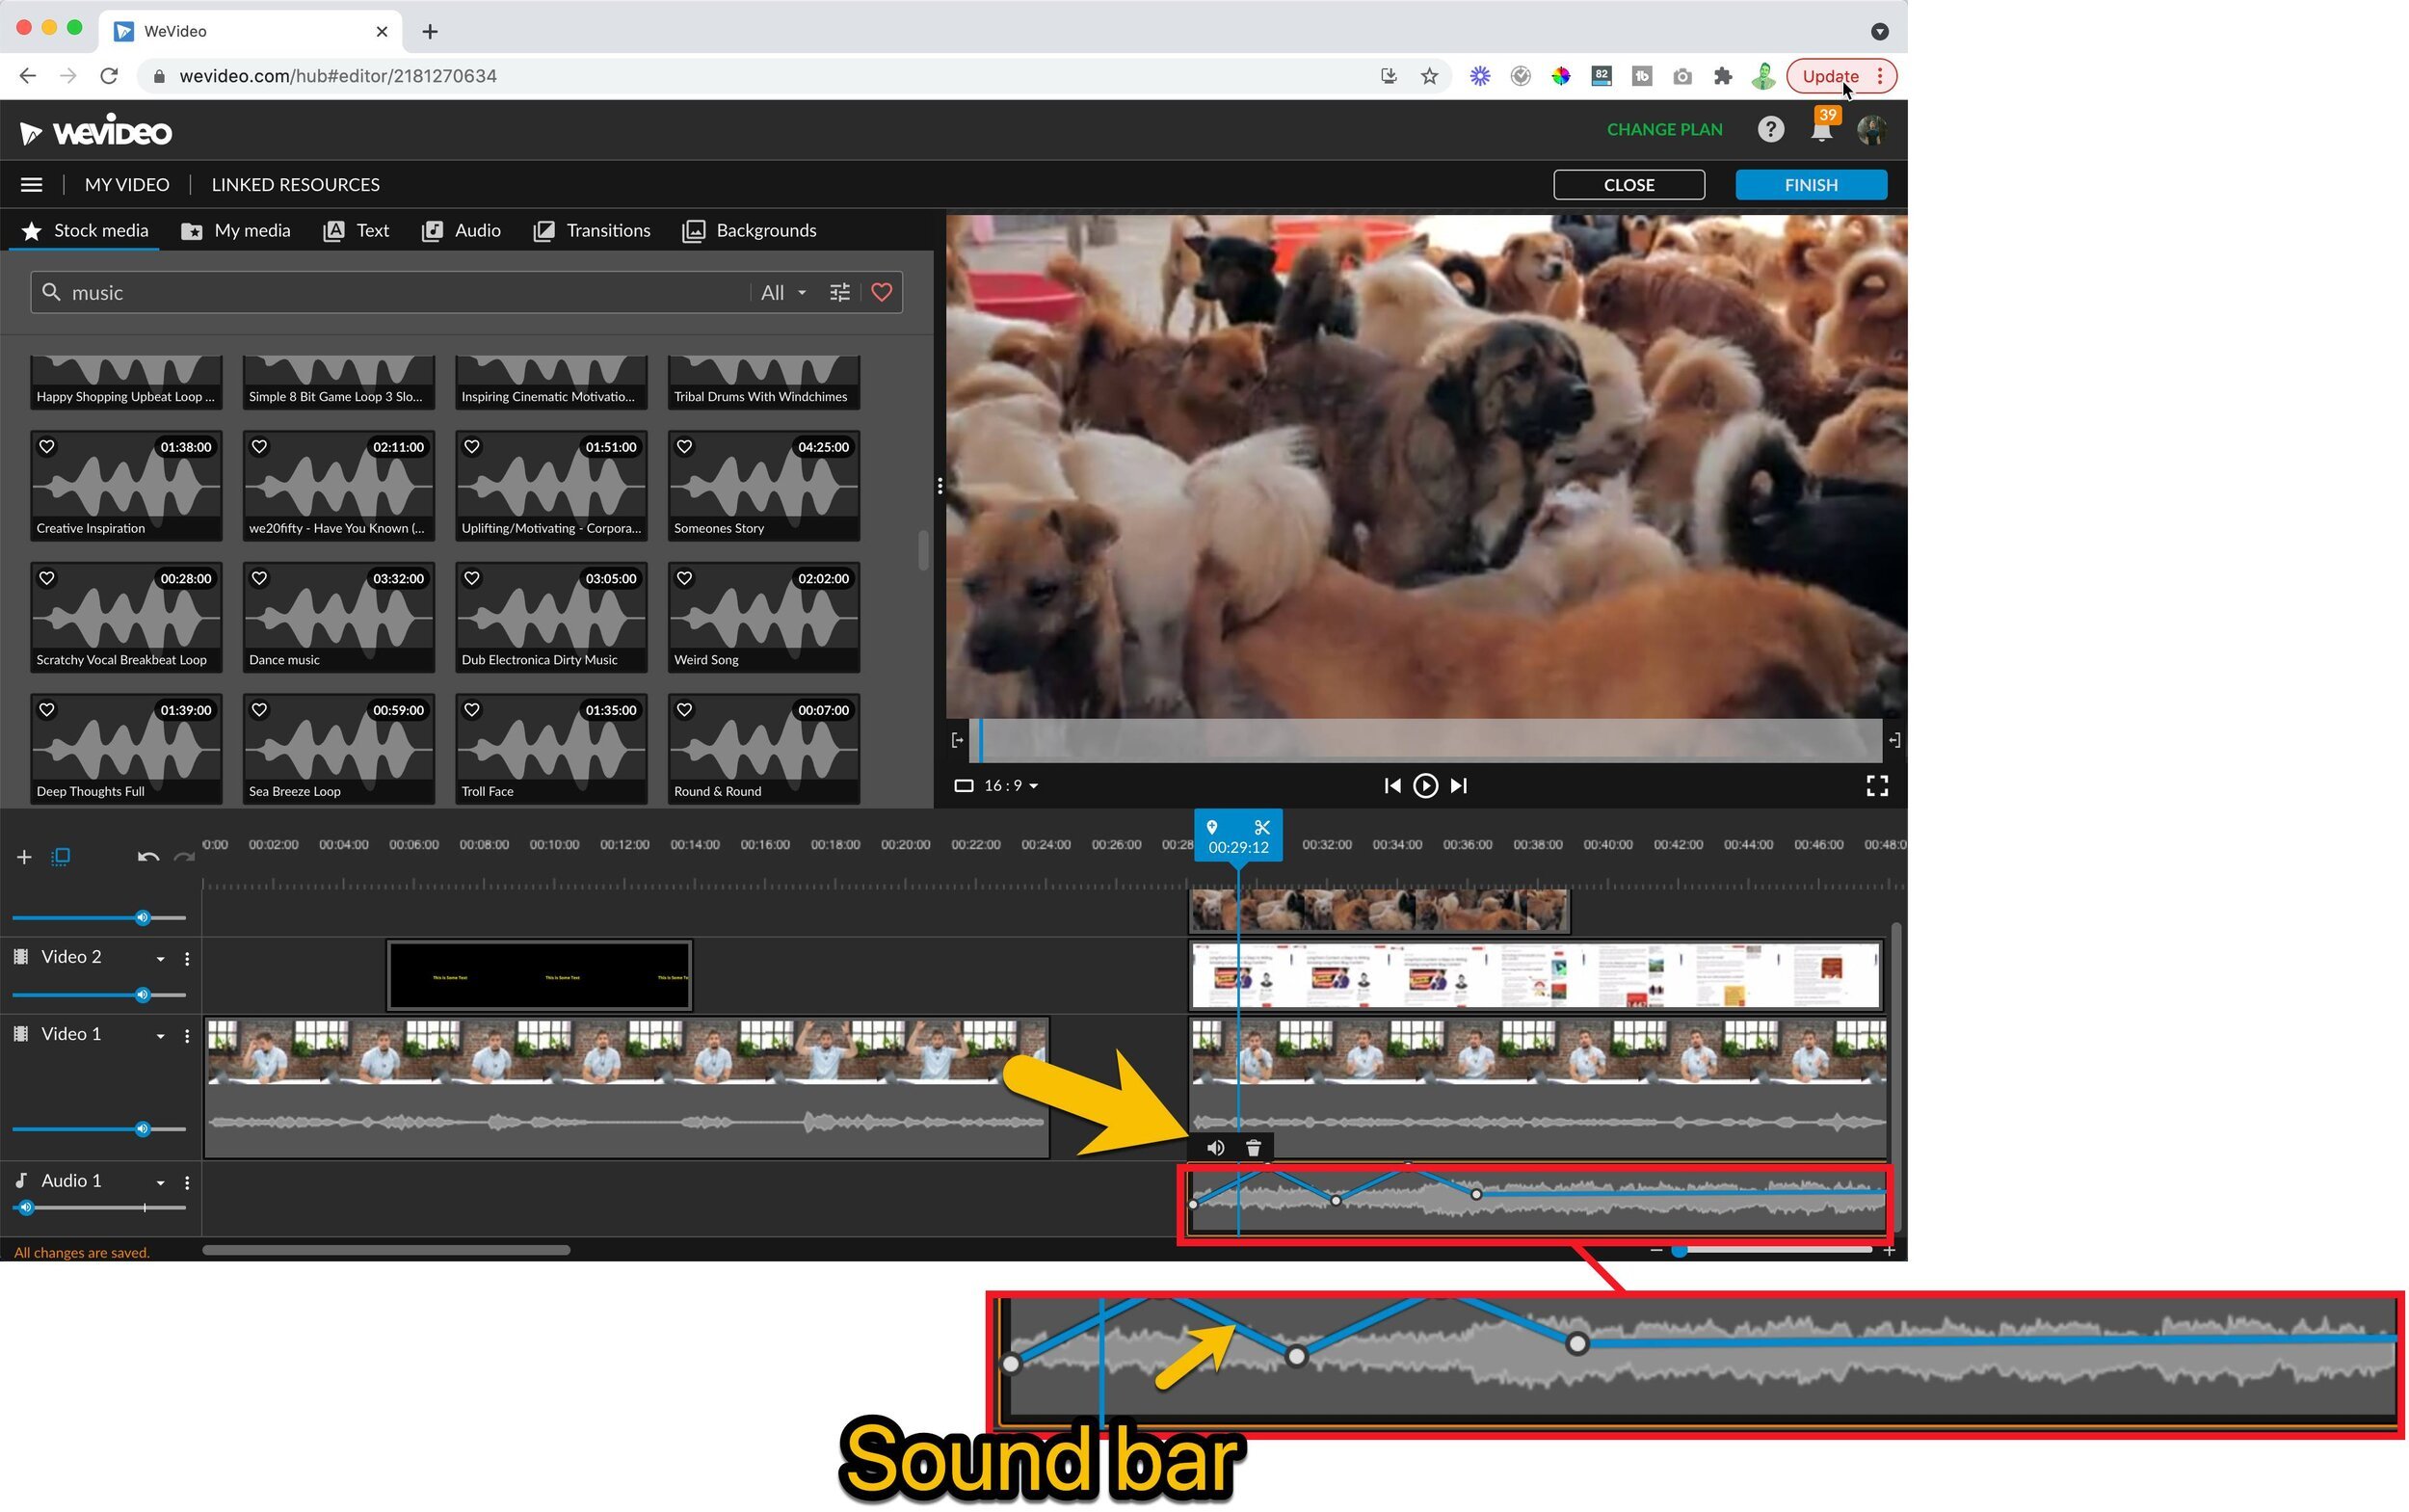
You will want to adjust your audio levels so that they are just noticeable in the background of your video. Do so by using the volume bar on the left hand side of the audio track.

I keep sound effects like whooshes and bubble pops at about 25 percent and background music from 1-5 percent. You can also adjust the levels within the clip by clicking within the sound track and raising and lowering the sound bar you just created.
This can be helpful if you are trying to have music fade in our out at the beginning or the end of a clip.
Additionally if you have a soundtrack that has distracting high volume drumbeats you and adjust the volume AND adjust the levels inside the clip to mute sharp sounds.
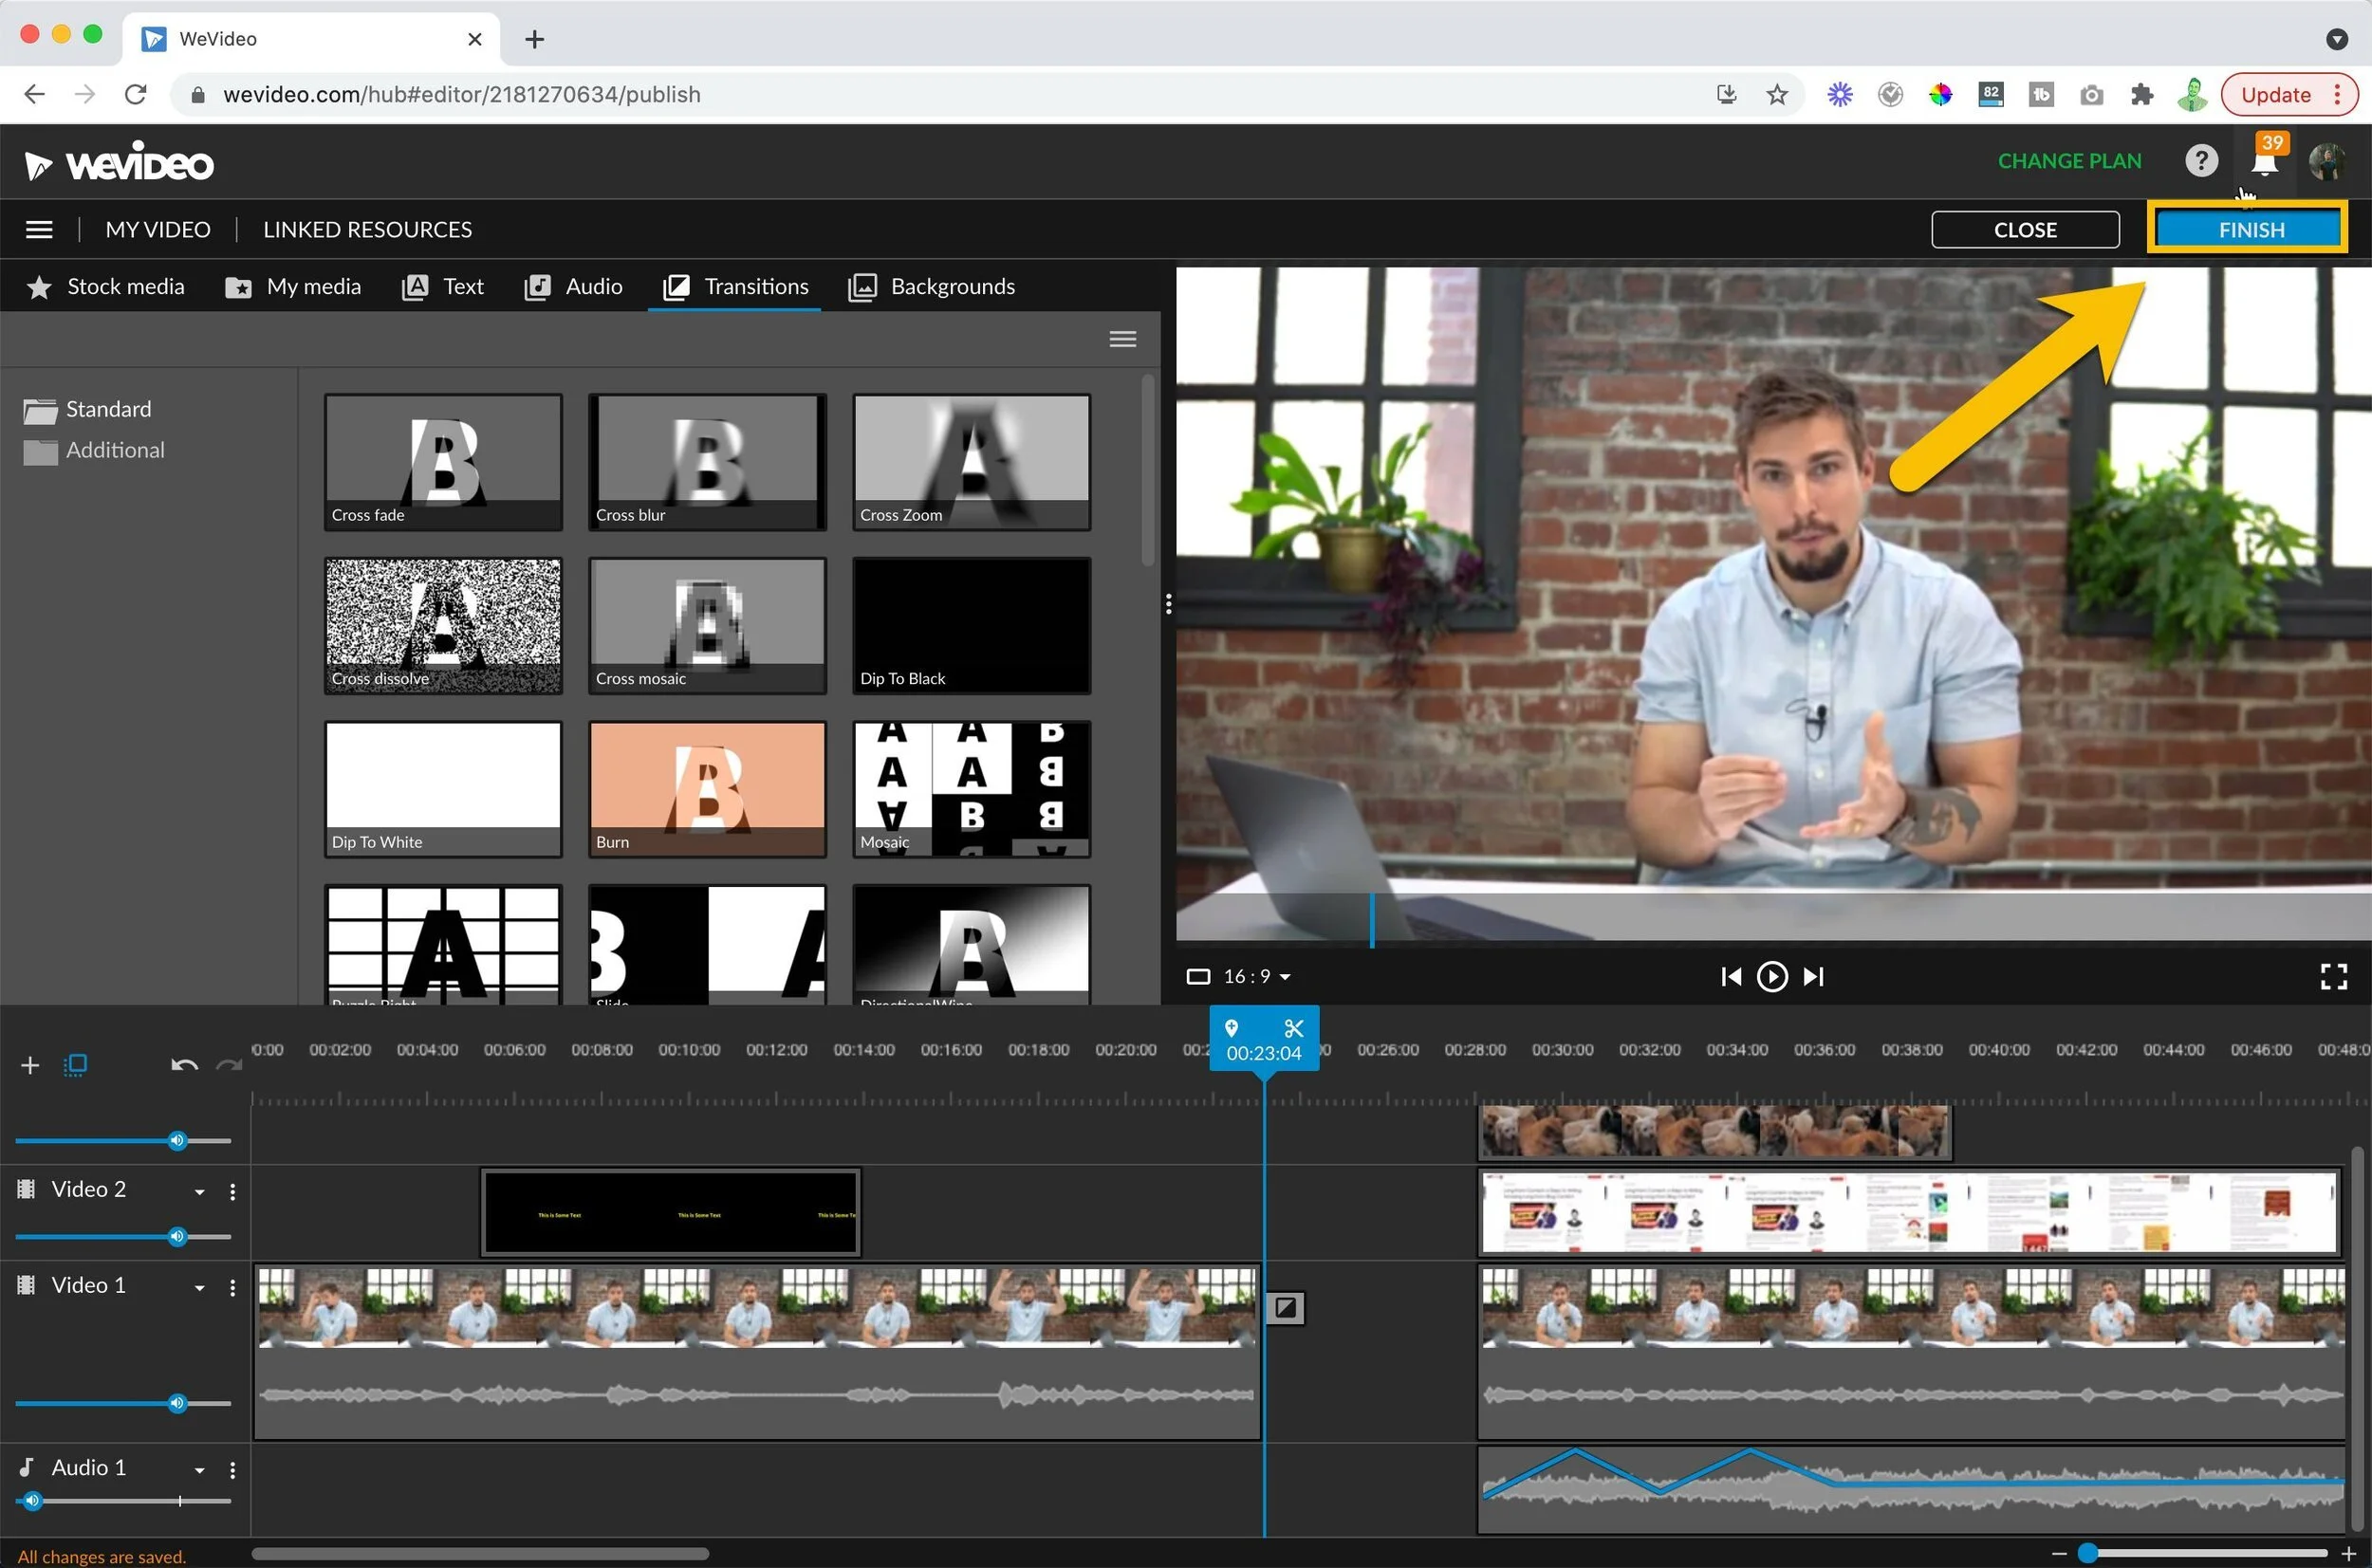
Last is transitions. I personally don't use more than a standard fade to white or fade to black transition for videos, but you do have a bunch of options to play around with. Less is more here. So use them sparingly.

Exporting Your Video in WeVideo
Once you have your video ready to go click “finish”.
Name your video if you haven't already.

Export in the highest quality the camera you filmed on will allow.

It will take some time for it to finish processing but you'll get an email when it's done and you can find it on the exports tab. Here you can download the footage or even share a link with someone for feedback on your video, which is super helpful.
Summing It Up
Editing video doesn’t have to be super complicated. If you edit backwards and stick to the fundamentals you can create amazing videos that dazzle your audience.
Check out my 5 tips to making your edits more engaging in my Ultimate Guide to Creating a Successful Video Marketing Campaign: 20 Steps To Create Awesome Video.

Hey, I'm Clint.
I love to create content that helps businesses and agencies get better results faster


